How to make blurry photos clear?
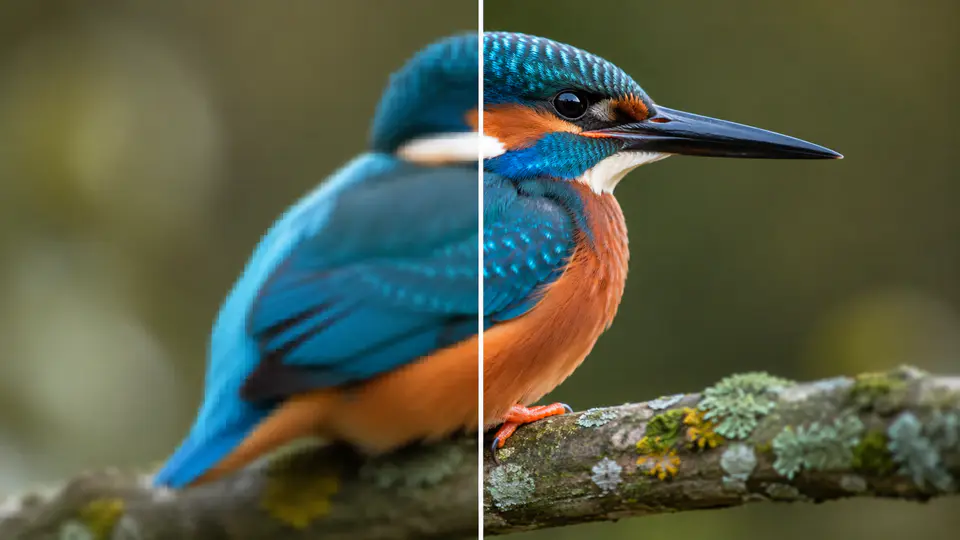
A blurry photo does not always need to be discarded. Small camera shake, missed focus, compression, and low resolution can often be improved with the right AI workflow. The key is to start from the best original file you have, enhance it carefully, and check the result at full size instead of relying only on a small preview.
This guide shows how to make a blurry photo clearer online with Imgkits, when to use an unblur tool, and when an image enhancer is a better choice.
Why Photos Become Blurry or Low Resolution
Most unclear photos come from one of a few common problems. A phone may move while the shutter is open, the subject may move faster than expected, the camera may focus on the background instead of the face, or the image may have been compressed after being shared through messaging apps or social media.
Different problems need slightly different fixes. Motion blur and soft focus usually need an unblur workflow. Small images, compressed screenshots, and older web graphics usually need resolution enhancement and detail recovery. If both issues are present, use unblur first, then enhance the final image.
How to Make a Blurry Photo Clear Online
Imgkits provides a browser-based workflow, so you do not need to install Photoshop or learn manual sharpening settings. For most users, the best first step is the Imgkits Unblur Image tool.
Step 1: Upload the Best Original Image
Use the highest quality version you can find. If you have the original camera image, use that instead of a screenshot or a file downloaded from social media. AI enhancement works better when it has more real image detail to recover.
Step 2: Remove Blur Before Upscaling
Open the unblur tool, upload the image, and let Imgkits recover edges, facial details, text clarity, and object contours where possible. This is useful for portraits, product photos, travel shots, old family pictures, and images that look soft because of camera shake.
After processing, zoom in to 100% and compare important areas such as eyes, hair, product labels, building edges, and text. If the improved image looks natural, download it or continue with enhancement.
Step 3: Enhance Resolution and Detail
If the image is still too small or compressed, use the AI Photo Enhancer to improve detail and overall clarity. This step is especially helpful for old photos, ecommerce images, social posts, profile pictures, and images that need to look cleaner on larger screens.
Step 4: Export a Clean Final Version
Download the final result after checking that faces, edges, and textures still look realistic. Avoid running the same image through too many tools repeatedly, because over-processing can create harsh edges or unnatural skin texture.
When AI Enhancement Works Best
AI photo enhancement works best when the original image still contains some real structure. It can often improve mild blur, low resolution, compression artifacts, and soft details. It is not magic: if the original image is extremely blurred, very dark, or missing important visual information, no tool can perfectly reconstruct the real scene.
For best results, use this checklist:
- Use the original file whenever possible.
- Fix blur before increasing image size.
- Check the result at 100% zoom before publishing.
- Keep skin, fabric, and product textures natural.
- Save a copy of the original image so you can compare results.
Imgkits vs Photoshop Sharpening
Photoshop can sharpen photos manually, but it requires more judgment. You need to choose the right filter, adjust the radius and amount, protect edges, and avoid creating halos. That level of control is useful for professional retouching, but it can be slow for everyday fixes.
Imgkits is better when you need a fast online result: upload, process, compare, and download. For creators, ecommerce sellers, students, and office users, the AI workflow is usually enough to make a soft photo clearer without manual editing experience.
Common Use Cases
You can use this workflow for old family photos, blurry travel pictures, profile images, product photos, screenshots, scanned documents, and social media visuals. If your image also has unwanted marks, text overlays, or distracting objects, you can continue editing with other Imgkits tools after improving clarity.
FAQ
Can AI make every blurry photo clear?
No. AI can improve many soft or compressed photos, but it cannot perfectly recover details that never existed in the file. Mild blur and low resolution usually respond much better than extreme motion blur.
Should I unblur or enhance resolution first?
Start with unblur when the photo is soft or shaky. Use resolution enhancement after that if the image is still too small or compressed.
Will enhancement make the photo look fake?
It can if you over-process the image. Use the best original file, compare before and after, and stop when the result looks clear but still natural.
Do I need Photoshop for this?
No. Photoshop is useful for manual control, but Imgkits is simpler when you want a quick online way to make a blurry photo clearer.