How to quickly delete unwanted people from photos?
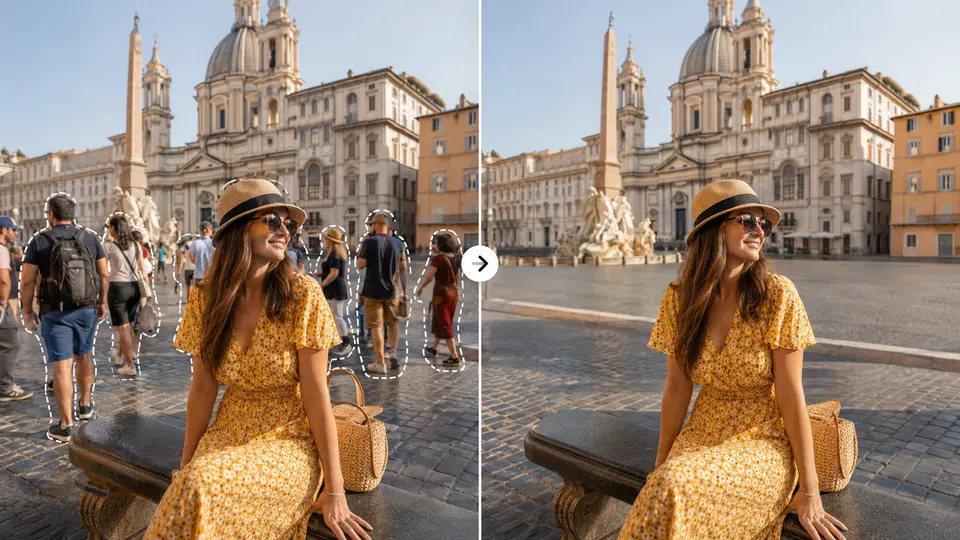
When traveling or taking photos in our daily life, we often encounter strangers intruding into the shot. Or maybe you took a picture with an ex-partner, ex-friend or someone who is no longer in your life for many reasons and now you don’t feel like it anymore. imgkits offers the “Remove tourists or other unwanted objects” feature to help you solve this problem perfectly. The “Remove tourists or other unwanted objects” function provided by imgkits can help you solve this problem perfectly, by quickly erasing the people you don’t want.

Step 1: Open into Imgkits and select ” Remove tourists or other unwanted objects “

Step 2: Click “Upload Image” and upload the photo of the person you need to erase

Step 3: Use the brush to mark the person to be erased, and the system will erase automatically after the erasure is completed

Brush smear marker

Click “Smear repair” on the left to adjust the brush size; click “Tick repair” on the left to switch to the lasso tool for drawing; click “Polygonal lasso” to switch to the polygonal lasso tool for drawing.

Finish removing the watermark

Click “Previous” above to undo the current operation and go back to the previous step; click “Next” to cancel the undo operation and go to the next step.

Step 4: Click “Download” in the upper right corner to download and save the watermarked photos; click “Re-Upload” to re-select the new images to upload

Effect

This is the step by step method to use imgkits to erase unwanted people from your photos, is it very easy? If your photo has more people and complex, you can paint the people area in several times, this will take more time but the final result will be better than you think, come and try it.

How to make blurry photos clear?

Whether it is a cell phone or a professional digital camera, when taking photos, the photos taken will be blurred and unclear due to the movement of the subject, improper camera grip or focusing errors. So what are the ways to make these blurred photos clear?

Method 1: Use imgkits’ image resolution enhancement function

Imgkits is a professional online image restoration and processing website with powerful intelligent AI image processing technology, with a variety of image restoration and processing functions, improving image resolution is one of them. What’s more is that you only need to upload a blurry photo and wait for 5 seconds to get a clear photo after processing quickly, you don’t need to have any image processing skills, it will also protect and delete all your uploaded items within 24 hours and no one can access and view them without your permission.

How to use Imgkits to enhance image resolution:

Step 1: Open into Imgkits and select “Increase Resolution of Image”

imgkits official website home page

Step 2: Click “Upload Image” and upload the photo you need to improve the resolution

Increase Resolution of Image

Step 3: Click “Download” in the upper right corner to download and save the clear image; click “Re-Upload” to re-select and upload a new image

Method 2: Use Photoshop for sharpening

Adobe Photoshop requires more skilled software operation skills, if you are a Photoshop enthusiast, then you can use it to improve the clarity of the image, if you have never touched it is not recommended, then you may need to spend a lot of time to get familiar with using it.

Step 1: Open the image in photoshop and convert it to a smart object

Step 2: Select the smart sharpening filter, adjust the sharpening and edges and other values

Step 3: Change the blending mode of the image to Brightness

Conclusion:

Through the above 2 methods we can see that Imgkits smart enhance image resolution is more simple and fast, can save us a lot of time, is a more simple and fast method.

Is photography really the art of using light?

We all know that photography is only possible when there is light, so light plays a rather important role in the success or failure of a photograph. Indoors we can use a variety of artificial light sources such as flashes and tubes to take photographs.

In a natural environment, however, we can make use of natural light to create an equally impressive shot without the help of artificial light. Natural light is the light from the sun hitting the earth. Here’s a quick look at some of my photography using natural light.

You will find that even if you are photographing the same subject, the results will vary from time to time, sometimes the image may appear harder, sometimes softer, or the colour of the image may be cooler at one time and warmer at another, all of which are related to natural light.

Characteristics of light for shooting throughout the day

① Early morning (soft, light in cool colours)

Dawn before sunrise, low-angle light scattered, mainly blue and cool tones, the intensity of light is very weak, the contrast of the scene is also weak. The sky is in an eerie blue at this time and the image has a soft, bluish, cool tone to it. As the moment of sunrise approaches, the brightness of the entire sky increases, and the sky near the horizon gradually changes from a cool blue, to a gradually brighter light and higher colour temperature as sunrise approaches, changing a little to a gradually warmer colour such as light pink and pink, a rapid and subtle change in colour and tone.

This is why the morning is generally a good time for us to shoot as a portrait, suitable for shooting some fresh subjects.

②High noon (hard light)

In travel or everyday photography, sometimes what is called “high noon” actually appears slowly half an hour after sunrise, when the clouds have cleared. The light at this time is top light, i.e. the direction of projection is perpendicular or almost perpendicular to the horizon, and the backlight area is heavily shadowed at this time. If you take a portrait in top light, it will cause severe shadows under deep-set eye sockets and protruding noses, creating a hard or even horrific effect, and portraits taken in this way often do not work well.

But if we make the most of some of the shadows to tone down the strong light ratios, it can often have a surprising effect.

Making full use of shade, sun hats and other ways to reduce the light pen on the face can effectively avoid “ghosting” on the model’s face while also increasing the sunlight dappled atmosphere. This is a great way to kill two birds with one stone.

In addition, by adjusting the pose of the model and your own camera position, you can also achieve a surprising effect.

The model can effectively avoid large light ratios on the face by burying her head and looking down at the POSE.

At the same time, we can also lower our camera position and use a low camera position to shoot upwards to achieve a backlight-like effect, which also effectively avoids the appearance of large light ratios on the face.

③Sunset (soft, with predominantly warm light)

The light at sunset is similar to sunrise in that it is low-angle, flat light, but it has a warmer effect. A backlit scene shows a sun that resembles an ‘egg yolk’ and will be covered in a golden hue. If you miss the sunrise during your trip because you have trouble getting up, sunset is undoubtedly the best time to take portraits because it is the ideal time to shoot light, with richly coloured clouds and a half hour after sunset, when the clouds are more colourful, gradually changing from warm to cool colours, making the hour before and after sunset a prime time to take portraits.

Backlighting at sunset can give a very strong and beautiful atmosphere, making our work even more beautiful and romantic.

A soft sunset can give the model’s face a sense of dimension and thus better portray the emotion being expressed.

So as you can see, it is not only in artificial light that you can produce great light portraits. As long as we use all kinds of natural light wisely, we can also produce excellent light and shadow portraits.

imgkits online smart photo processing tool can quickly beautify and repair the photos you take, remove all kinds of watermarks mark defects, smart beautify and repair, is the best tool for photo post-processing.

How to restore faded photos in 10 seconds?

Sun fading is a common issue when displaying our favourite photos that are exposed to sunlight, over time it will damage the photo. Here is a 4 step guide: How to restore a sun faded photo.

Type 1: Repair with photoshop

1. Equalise the tones

The first step is to equalise the tonal range. Start by adding a black and white adjustment layer and then isolating the faded area with a selection. By viewing the Channels in Photoshop you see the colour separations and where the problem areas lie. Working with one Channel at a time, adjust the levels to equalise the tones to match those outside of the faded area. Now turn off the black and white adjustment layer.

2. Fix the discolouration

Next is to reapply colour tones to make the photo look natural once again. This can be done by adding colour tones to a combination of layers set to ‘Colour’ and ‘Soft Light’. A good tip is to sample the colours outside of the faded area, the aim here is to match the colours as close as you can.

3. Remove the halo effect

With the tonal and colour fading fixed, the last step is to remove the halo effect around the window area. Make a copy of your layer group and merge the copy into a single layer.  Using the Clone Stamp and Healing tools blend out the halo line.

4. Finishing touches

For some finishing touches, you may need to sharpen the overall image and do some Level and Colour Balance adjustments.

Type 2: Smart repair using imgkits

It is recommended to use imgkits to repair faded photos after sun exposure. imgkits has powerful intelligent photo processing technology. It only takes one minute to repair damaged, faded, yellowed, spotted, elongated, blurred, and distorted photos, and restore the original appearance of the photo.

how to Filling Voids In Old Photos?

If your photograph is unfortunately damaged by a large gap or hole, as in the missing corner shown in the image below, you’ll have to perform some reconstructive surgery. The larger the void and the more detail surrounding it, the trickier the reconstruction will be. You can certainly fall back on cropping as a crutch in order to minimize the opening—depending on its location, of course. But if you’re lucky, the missing area will be in a background or piece of clothing that is at least manageably repairable.

This vintage photo is in generally good condition with the exception of one prominent crease through the center of the frame and a large hole where the corner has gone missing.

Type 1: Repair with photoshop

To start, make a selection from a nearby area that is appropriate to fill in the void. If you’re replacing with trees and shrubs, copy from an area of trees and shrubs. If you’re replacing part of a garment, select from another area of the garment. Copy the selection to a new layer, move it into place over the gap, and use the Transform tool (found under the Edit menu) to rotate, resize and shape the element to fit appropriately over the hole. Then, use the Patch tool (be sure it’s set to Content-Aware and Sample All Layers) overlapping the edges of the patch in order to make it blend seamlessly into the background. This generally does a great job of softening the hard edges from the copy/paste patch.

o repair the void in the corner, start by selecting an appropriate area nearby, then copying and pasting it over the void.
Using the patch tool set to sample all layers, the rectangular patch can be seamlessly blended into the image to cover up the hole.

Another way to fill gaps in the image is with the Paint Bucket. This approach works best if you’re repairing a portion of the image without many changes in shape, texture or detail.

To use it, start with the lasso tool to draw a selection around the void, then activate the Paint Bucket and option-click (or alt-click) to select an appropriate color from a nearby area of the image. Click inside the selection to fill it with the paint color, then again switch to the patch tool. Ensure it is still set to Content Aware mode in the Options bar. (If the Options bar does not show by default at the top of the Photoshop window, turn it on under the Window menu by clicking on Options so that a checkmark appears. Then, click and drag as before to choose an appropriate area nearby to fill in the texture of the patch and blend it with the previously established color.)

The hole repaired and the crease eliminated with diligent use of the clone stamp and spot healing brush, the image is restored to its original splendor.

Type 2: Smart repair using imgkits

Compared with the manual use of photoshop software, the biggest advantage of imgkits is that you only need to upload photos. The artificial intelligence system will automatically identify the wrinkles, spots, missing, color and other defects of the uploaded photos, and the photos can be repaired in 1 minute.

Intelligently remove the watermark and repair the picture without any trace!

Traditional watermarking methods may provide various methods such as fuzzy, dynamic fuzzy, corrosion, mosaic, frosted, and grid formats. It is also possible to use the average value of the surrounding image pixels, but it is nothing more than rigid, and it is easy to see the traces, which is very unnatural.

The following picture is an example

We use the traditional method to erase the characters in the upper right corner, and the average pixel value of the surrounding pictures

It can be seen that the traces are very obvious

Using Inpaint, you can recover some of the lost photos in a few seconds. Replace any missing, deteriorated or unwanted parts of the picture, it will automatically recognize the surrounding environment and perform intelligent filling, so that the repaired picture can easily remove the defects without any trace.

Screenshot demo

First wipe the area to be removed

Click “Start Repair

I can hardly see it anymore, the ripples on the water have even reappeared!

How To Repair Scratches, Tears, and Spots on an Old Photo

As digital photography becomes more and more popular, many people turn their old paper photos to digital form to store and view them on modern computers. Nevertheless, old photos are not always in the perfect condition: tears, spots and cracks remain even on electronic pictures.

Inpaint fixes this problem by providing a simple way to remove various defects from old photos in merely two steps.

Step 1: Enter the inpaint old photo page

Step 2: Click the upload image button to select the scanned

Step 3: Wait for the system to process automatically

Wait a few seconds, the system will automatically process the scratches, tears and spots of the photos, and enter the effect preview page, and you can choose to save the repaired photos to the computer or mobile phone.

Erase Power Lines from a Photo without any graphics skills

Sometimes power lines crossing the composition spoil an otherwise perfect photo. An exciting gothic temple, a beautiful mountain panorama, or a gripping night cityscape slashed by ugly wires hanging in the air can be upsetting. Indeed, we rarely have a chance to revisit those places to take another shot, and often we just can’t choose better perspective to render the power lines invisible.

With Inpaint, erasing power lines from a photo is easy as clicking a switch!

Step 1: Open the photo with Inpaint

Step 2: Use the Marker tool to select power lines

Use the tool to select the power lines you want to erase,Smear and cover the power cord and object to be removed, as shown in the figure below.

Step 3: Run the restoration process

With Inpaint the entire process takes as little as 1 minute, and you don’t need any specific knowledge or tools!

Remove people from photo: the easy way

We all have photographs with unwanted visitors. Perhaps it was impossible to take a picture of the view without someone walking in front of your camera. Maybe you didn’t notice the person’s head until you got home. Or possibly you couldn’t even see the person walking in the background, spoiling that otherwise perfect shot.

The good news is that there are many solutions for removing people from your photo, but most, unfortunately, are complicated to use and expensive.

Inpaint makes quick and easy work of removing people from your photographs with incredible ease.

Step 1: Load the image with the unwanted people

The scenery is spectacular, but unwanted people in the foreground spoil the picture. Get ready to remove the people from the photo!

Step 2: Select the people to remove

If required, zoom in to the people you wish to take out of the picture. Then simply drag the marker over the people you wish to remove – that’s it. No need for fiddling around with great precision – let the software take care of the finer details for you.

Step 3: Unwanted people are magically removed!

One click of the mouse and the unwanted people vanish before your eyes – that’s it. It really is that simple!

Step 4: Clean up any other people you wish to remove

Repeat the above steps to quickly and easily remove other people from the photo.

Step 5: Enjoy your perfect people-free photo!

All the people have been removed in less than two minutes! It couldn’t be simpler or more effective.

Effectively Remove Shadow from a Photo

Have you ever taken a perfect photo, except for some shadows (or dark patches) that spoil everything? In digital photography, with the right editing tools things can be improved with just a few clicks.

What you’ll need to remove shadows from an image is the Inpaint photo editing software.

Step 1: Open the photo with a shadow in Inpaint

Step 2: Use the Marker tool to select a shadow area

Switch to the Marker tool on the toolbar and select the shadow area. Note that you can adjust the precise size of the marker for fine selection.

Step 3: Run the shadow removal process

Finally, run the restoration process – just click the ‘Erase’ button. Inpaint will remove the shadow and other imperfections from your photo.