Remove people from photo: the easy way
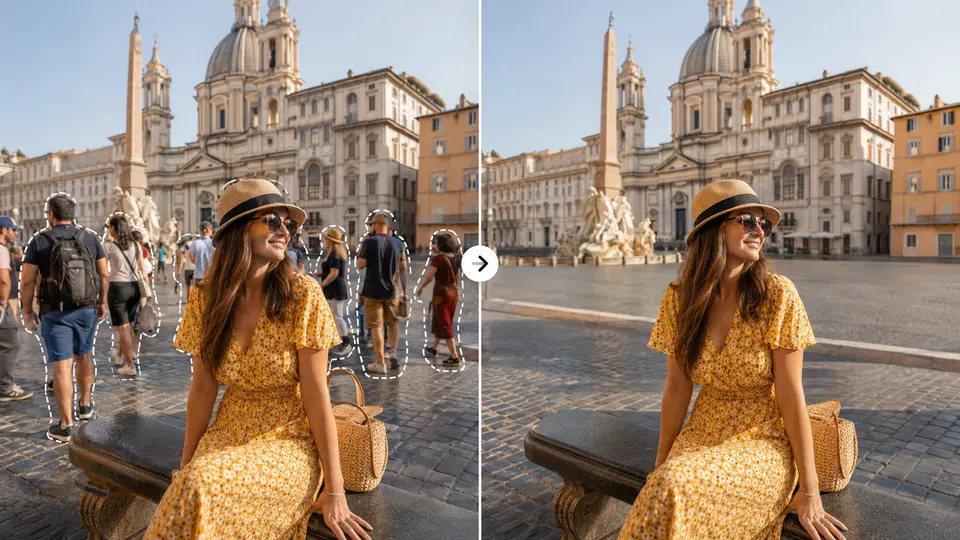
Unwanted people can ruin an otherwise strong photo. A passerby may walk into a travel shot, a stranger may appear behind a portrait, or a crowded background may distract from the subject you actually wanted to keep.
With Imgkits, you can remove people from a photo online by selecting the person and letting AI rebuild the surrounding background. This guide explains the practical workflow, how to get cleaner results, and when a general object remover is useful for a second pass.
Before You Remove Someone from a Photo
Only edit photos you own, have permission to modify, or are legally allowed to use. Removing people is appropriate for personal travel photos, real estate images, ecommerce backgrounds, social posts, and creative edits. It should not be used to misrepresent news, evidence, official records, or sensitive situations.
How to Remove People from a Photo Online
For most photos, start with the Imgkits remove people from photo tool. It is built for people-shaped distractions and works best when the person you want to remove is clearly separated from the main subject.
Step 1: Upload the Photo
Choose the best-quality version of the image. Avoid screenshots or heavily compressed files if you have the original photo, because higher resolution gives the AI more detail to use when rebuilding the background.
Step 2: Select the Person You Want to Remove
Use the brush to cover the unwanted person. Include the full body, shadow, and any items connected to them, such as bags, hats, bicycles, or reflections. A clean selection helps the AI understand exactly what should disappear.
Step 3: Run the AI Removal
Process the image and inspect the result at full size. Simple backgrounds such as sky, water, walls, pavement, and sand are usually easier. Complex backgrounds with faces, text, windows, or patterned clothing may need more careful selections.
Step 4: Clean Up Remaining Details
If a small mark, shadow, or object remains after the first pass, use the remove object from photo workflow to touch up the area. This is useful when the person overlaps with signs, railings, furniture, plants, or other details.
Step 5: Download the Final Image
When the edited background looks natural, download the final image. Keep the original file as a backup so you can compare before and after or restart the edit if needed.
Tips for Better People Removal
- Select the whole person, not just the face or clothing.
- Include shadows and reflections when they belong to the person.
- Work in smaller passes for crowded or complex backgrounds.
- Zoom in to check edges before publishing or printing.
- Use the highest-quality original image whenever possible.
When to Use Remove People vs Remove Object
Use the people remover when the main distraction is a person or a group. Use the general object remover when you need to clean leftover marks, bags, poles, text, signs, or other non-person objects from the same photo.
For difficult images, combine both tools: remove the person first, then use object cleanup for smaller details. This keeps each selection focused and usually produces a more natural result.
FAQ
Can Imgkits remove a person from a crowded background?
Yes, but crowded scenes may need several smaller edits. Remove one person or one section at a time and review the result before continuing.
Will the background look natural after removing someone?
It depends on the photo. Simple backgrounds are easier, while detailed areas may need a second cleanup pass. A careful selection improves the final result.
Can I remove people from travel and real estate photos?
Yes, if you own or are allowed to edit the image. This workflow is useful for travel memories, property photos, listing images, and clean social media visuals.
Do I need Photoshop?
No. Photoshop can do this manually, but Imgkits is faster when you want to remove people online without learning clone stamp, healing brush, or layer masking tools.