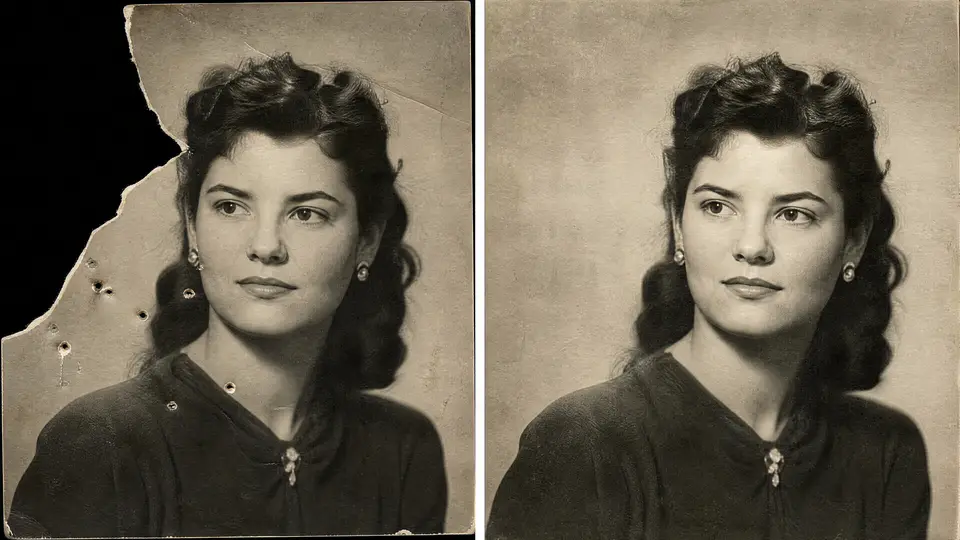
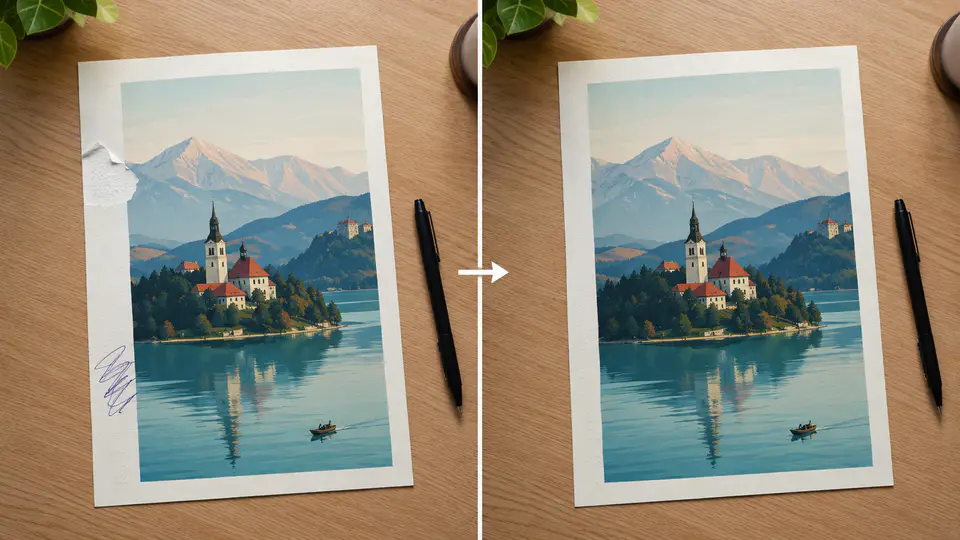
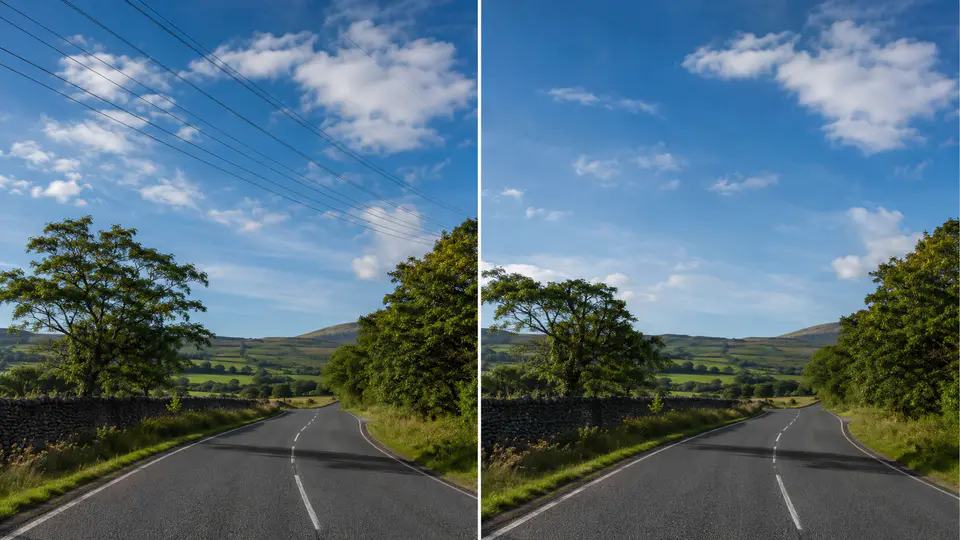
How to restore faded photos in 10 seconds?

Sun fading is a common issue when displaying our favourite photos that are exposed to sunlight, over time it will damage the photo. Here is a 4 step guide: How to restore a sun faded photo.

Type 1: Repair with photoshop

1. Equalise the tones

The first step is to equalise the tonal range. Start by adding a black and white adjustment layer and then isolating the faded area with a selection. By viewing the Channels in Photoshop you see the colour separations and where the problem areas lie. Working with one Channel at a time, adjust the levels to equalise the tones to match those outside of the faded area. Now turn off the black and white adjustment layer.

2. Fix the discolouration

Next is to reapply colour tones to make the photo look natural once again. This can be done by adding colour tones to a combination of layers set to ‘Colour’ and ‘Soft Light’. A good tip is to sample the colours outside of the faded area, the aim here is to match the colours as close as you can.

3. Remove the halo effect

With the tonal and colour fading fixed, the last step is to remove the halo effect around the window area. Make a copy of your layer group and merge the copy into a single layer.  Using the Clone Stamp and Healing tools blend out the halo line.

4. Finishing touches

For some finishing touches, you may need to sharpen the overall image and do some Level and Colour Balance adjustments.

Type 2: Smart repair using imgkits

It is recommended to use imgkits to repair faded photos after sun exposure. imgkits has powerful intelligent photo processing technology. It only takes one minute to repair damaged, faded, yellowed, spotted, elongated, blurred, and distorted photos, and restore the original appearance of the photo.

how to Filling Voids In Old Photos?

If your photograph is unfortunately damaged by a large gap or hole, as in the missing corner shown in the image below, you’ll have to perform some reconstructive surgery. The larger the void and the more detail surrounding it, the trickier the reconstruction will be. You can certainly fall back on cropping as a crutch in order to minimize the opening—depending on its location, of course. But if you’re lucky, the missing area will be in a background or piece of clothing that is at least manageably repairable.

This vintage photo is in generally good condition with the exception of one prominent crease through the center of the frame and a large hole where the corner has gone missing.

Type 1: Repair with photoshop

To start, make a selection from a nearby area that is appropriate to fill in the void. If you’re replacing with trees and shrubs, copy from an area of trees and shrubs. If you’re replacing part of a garment, select from another area of the garment. Copy the selection to a new layer, move it into place over the gap, and use the Transform tool (found under the Edit menu) to rotate, resize and shape the element to fit appropriately over the hole. Then, use the Patch tool (be sure it’s set to Content-Aware and Sample All Layers) overlapping the edges of the patch in order to make it blend seamlessly into the background. This generally does a great job of softening the hard edges from the copy/paste patch.

o repair the void in the corner, start by selecting an appropriate area nearby, then copying and pasting it over the void.
Using the patch tool set to sample all layers, the rectangular patch can be seamlessly blended into the image to cover up the hole.

Another way to fill gaps in the image is with the Paint Bucket. This approach works best if you’re repairing a portion of the image without many changes in shape, texture or detail.

To use it, start with the lasso tool to draw a selection around the void, then activate the Paint Bucket and option-click (or alt-click) to select an appropriate color from a nearby area of the image. Click inside the selection to fill it with the paint color, then again switch to the patch tool. Ensure it is still set to Content Aware mode in the Options bar. (If the Options bar does not show by default at the top of the Photoshop window, turn it on under the Window menu by clicking on Options so that a checkmark appears. Then, click and drag as before to choose an appropriate area nearby to fill in the texture of the patch and blend it with the previously established color.)

The hole repaired and the crease eliminated with diligent use of the clone stamp and spot healing brush, the image is restored to its original splendor.

Type 2: Smart repair using imgkits

Compared with the manual use of photoshop software, the biggest advantage of imgkits is that you only need to upload photos. The artificial intelligence system will automatically identify the wrinkles, spots, missing, color and other defects of the uploaded photos, and the photos can be repaired in 1 minute.

Intelligently remove the watermark and repair the picture without any trace!

Traditional watermarking methods may provide various methods such as fuzzy, dynamic fuzzy, corrosion, mosaic, frosted, and grid formats. It is also possible to use the average value of the surrounding image pixels, but it is nothing more than rigid, and it is easy to see the traces, which is very unnatural.

The following picture is an example

We use the traditional method to erase the characters in the upper right corner, and the average pixel value of the surrounding pictures

It can be seen that the traces are very obvious

Using Inpaint, you can recover some of the lost photos in a few seconds. Replace any missing, deteriorated or unwanted parts of the picture, it will automatically recognize the surrounding environment and perform intelligent filling, so that the repaired picture can easily remove the defects without any trace.

Screenshot demo

First wipe the area to be removed

Click “Start Repair

I can hardly see it anymore, the ripples on the water have even reappeared!

How To Repair Scratches, Tears, and Spots on an Old Photo

As digital photography becomes more and more popular, many people turn their old paper photos to digital form to store and view them on modern computers. Nevertheless, old photos are not always in the perfect condition: tears, spots and cracks remain even on electronic pictures.

Inpaint fixes this problem by providing a simple way to remove various defects from old photos in merely two steps.

Step 1: Enter the inpaint old photo page

Step 2: Click the upload image button to select the scanned

Step 3: Wait for the system to process automatically

Wait a few seconds, the system will automatically process the scratches, tears and spots of the photos, and enter the effect preview page, and you can choose to save the repaired photos to the computer or mobile phone.

Erase Power Lines from a Photo without any graphics skills

Sometimes power lines crossing the composition spoil an otherwise perfect photo. An exciting gothic temple, a beautiful mountain panorama, or a gripping night cityscape slashed by ugly wires hanging in the air can be upsetting. Indeed, we rarely have a chance to revisit those places to take another shot, and often we just can’t choose better perspective to render the power lines invisible.

With Inpaint, erasing power lines from a photo is easy as clicking a switch!

Step 1: Open the photo with Inpaint

Step 2: Use the Marker tool to select power lines

Use the tool to select the power lines you want to erase,Smear and cover the power cord and object to be removed, as shown in the figure below.

Step 3: Run the restoration process

With Inpaint the entire process takes as little as 1 minute, and you don’t need any specific knowledge or tools!

Remove people from photo: the easy way

We all have photographs with unwanted visitors. Perhaps it was impossible to take a picture of the view without someone walking in front of your camera. Maybe you didn’t notice the person’s head until you got home. Or possibly you couldn’t even see the person walking in the background, spoiling that otherwise perfect shot.

The good news is that there are many solutions for removing people from your photo, but most, unfortunately, are complicated to use and expensive.

Inpaint makes quick and easy work of removing people from your photographs with incredible ease.

Step 1: Load the image with the unwanted people

The scenery is spectacular, but unwanted people in the foreground spoil the picture. Get ready to remove the people from the photo!

Step 2: Select the people to remove

If required, zoom in to the people you wish to take out of the picture. Then simply drag the marker over the people you wish to remove – that’s it. No need for fiddling around with great precision – let the software take care of the finer details for you.

Step 3: Unwanted people are magically removed!

One click of the mouse and the unwanted people vanish before your eyes – that’s it. It really is that simple!

Step 4: Clean up any other people you wish to remove

Repeat the above steps to quickly and easily remove other people from the photo.

Step 5: Enjoy your perfect people-free photo!

All the people have been removed in less than two minutes! It couldn’t be simpler or more effective.

Effectively Remove Shadow from a Photo

Have you ever taken a perfect photo, except for some shadows (or dark patches) that spoil everything? In digital photography, with the right editing tools things can be improved with just a few clicks.

What you’ll need to remove shadows from an image is the Inpaint photo editing software.

Step 1: Open the photo with a shadow in Inpaint

Step 2: Use the Marker tool to select a shadow area

Switch to the Marker tool on the toolbar and select the shadow area. Note that you can adjust the precise size of the marker for fine selection.

Step 3: Run the shadow removal process

Finally, run the restoration process – just click the ‘Erase’ button. Inpaint will remove the shadow and other imperfections from your photo.

Methods and techniques for removing watermarks from pictures

In our study and daily work, we often use some picture materials. When your pictures cannot be used because of various watermarks, are you very helpless? Let me share with you several techniques for removing watermarks from pictures, let’s learn them together.

Type 1:Use PhotoShop to copy and overlay

Open the picture in PS, select the “Marquee” or “Lock Set” tool in the left toolbar, frame the area where the watermark is drawn, select “Transform Selection”, and move the selection to the same color background as the watermark area And select “Copy Selection”, and then use the move tool to move and cover the copied content to the watermarked area. This method is suitable for situations where the watermarking area and the surrounding area are the same or similar.

Type 2:Use PhotoShop’s imitation stamp tool

The imitation stamp tool can be regarded as a relatively practical tool, and it can also be called a very magical tool. It can copy all or part of it into a new image according to the scope of the smear. When we process images, we often use imitation stamp tools, and the scope of use is quite extensive.

Open the picture in PS, select the “Imitation Stamp Tool” on the left toolbar, press and hold the Alt key to select similar colors or patterns in other areas of the picture to sample, release the Alt key, and click or drag the watermark mark area to cover it , And fine-tune it with daubing and other tools after completion. This method is suitable for more complex watermarks and requires great patience from image processing personnel.

Type 3: Use inpaint AI technology to remove

imgkits has extremely advanced and mature AI processing technology. You only need to upload photos, smear the watermark you want to remove, you can quickly remove it automatically with one click, and download and save it. inpaint saves a lot of our work and image processing time, and is the best way to remove the image watermark mark processing.

Fast removal of text watermark in image

Today we will learn PS to watermark tutorial, quickly remove the text watermark in the image. In this tutorial, we use PS to remove the watermark from the text on the photo. Generally speaking, the operation is relatively simple. The text is now printed more simply. The key to establishing the text selection with the color range is to set the tolerance. This method is suitable for some relatively simple watermarks, such as some watermarks that are full of the whole picture, and the effect is not bad. We also need to use other operations to remove the watermark, But watermark too many photos, if there is no value, do not take the time to go.

Effect picture:

Original image:

Steps:

1. Use the marquee tool to select the text watermark.

2. Use the color range to create text selection.

3. Expand the tolerance by 1-2px.

4. Use content to fill out the text part.

carry out:

The above is the ps removing watermark tutorial, and I will introduce a method for fast AI artificial intelligence to quickly remove the text watermark.

imgkits has extremely advanced and mature AI processing technology. You only need to upload photos and smear the watermark you want to remove. You can quickly and automatically remove it with one click and download and save it. inpaint greatly saves our work and image processing time, which is the best way to eliminate the image watermark mark processing.