Restoring Faded Color Photos
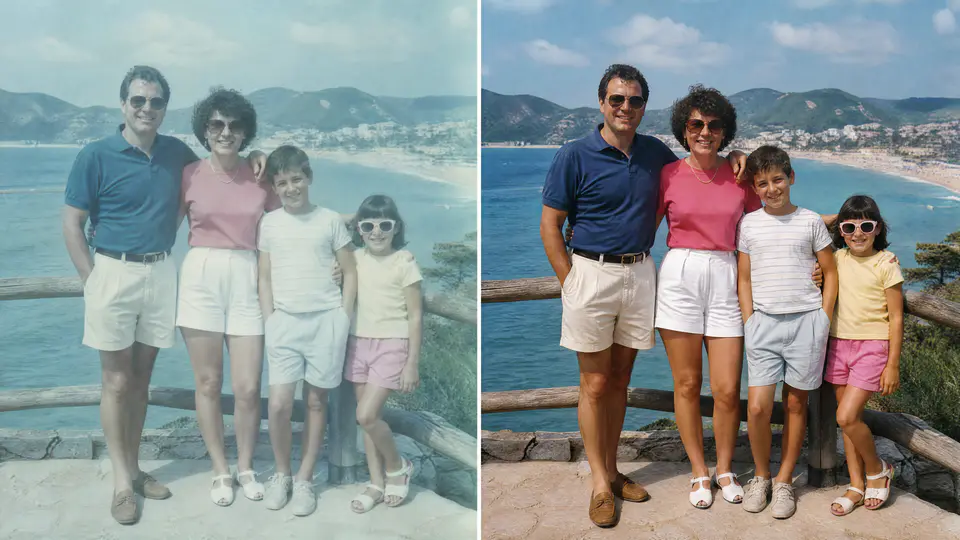
Type 1: Repair with photoshop

First, I open the image in Photoshop in order to address the color. Start by duplicating the image to a new layer so it’s easy to toggle the repaired layer on and off to check your progress and ultimately to more effectively blend the repaired image with the original if necessary.

I start my color repair with the simplest approach: using the Auto Color option under the Image menu. In my experience, this technique almost always makes a notable improvement, and frequently it’s all but perfect. With the example here, the Auto Color adjustment worked terrifically. For further fine-tuning or if Auto Color simply isn’t cutting it, I suggest using a Hue/Saturation adjustment layer. This allows you to tweak individual colors, dialing down green for instance, or increasing the saturation in whatever colors need it.

The final step for almost any color adjustment is dialing in the black point. This can be done easily with a Levels adjustment layer.

Click the top eyedropper in the adjustment layer window to activate the Black Point selection tool. Then, click on an area in the image that should be pure black, and watch as the adjustment layer automatically bases the black point on that selection. The middle eyedropper is for setting a gray point, which isn’t as crucial in my experience, but the third eyedropper is. It’s the white point eyedropper. Click this, then click on an area in the scene that should be pure white, and Photoshop will make it so.

Your image will likely have a much more pleasing contrast and saturation at this point, which can be further tweaked by grabbing the black point slider at the left of the histogram in the Levels adjustment layer panel. Here, you can dial the black level down even further or grab the slider at the right end of the histogram to bring down the highlights. You can watch the histogram for clues, too. If either end of the histogram shows a gap between the nearest peak and the edge of the frame, your black and white points are likely off. To repair this, click and drag to manually set new black and white points at the edges of those peaks.

Type 2: Smart repair using imgkits

Compared with using photoshop software manually, imgkits only requires you to upload photos with your fingers. The artificial intelligence system will automatically recognize the wrinkles, spots, missing, color and other defects of the photos, and it can repair and restore old photos in 1 minute.

how to Filling Voids In Old Photos?

If your photograph is unfortunately damaged by a large gap or hole, as in the missing corner shown in the image below, you’ll have to perform some reconstructive surgery. The larger the void and the more detail surrounding it, the trickier the reconstruction will be. You can certainly fall back on cropping as a crutch in order to minimize the opening—depending on its location, of course. But if you’re lucky, the missing area will be in a background or piece of clothing that is at least manageably repairable.

This vintage photo is in generally good condition with the exception of one prominent crease through the center of the frame and a large hole where the corner has gone missing.

Type 1: Repair with photoshop

To start, make a selection from a nearby area that is appropriate to fill in the void. If you’re replacing with trees and shrubs, copy from an area of trees and shrubs. If you’re replacing part of a garment, select from another area of the garment. Copy the selection to a new layer, move it into place over the gap, and use the Transform tool (found under the Edit menu) to rotate, resize and shape the element to fit appropriately over the hole. Then, use the Patch tool (be sure it’s set to Content-Aware and Sample All Layers) overlapping the edges of the patch in order to make it blend seamlessly into the background. This generally does a great job of softening the hard edges from the copy/paste patch.

o repair the void in the corner, start by selecting an appropriate area nearby, then copying and pasting it over the void.
Using the patch tool set to sample all layers, the rectangular patch can be seamlessly blended into the image to cover up the hole.

Another way to fill gaps in the image is with the Paint Bucket. This approach works best if you’re repairing a portion of the image without many changes in shape, texture or detail.

To use it, start with the lasso tool to draw a selection around the void, then activate the Paint Bucket and option-click (or alt-click) to select an appropriate color from a nearby area of the image. Click inside the selection to fill it with the paint color, then again switch to the patch tool. Ensure it is still set to Content Aware mode in the Options bar. (If the Options bar does not show by default at the top of the Photoshop window, turn it on under the Window menu by clicking on Options so that a checkmark appears. Then, click and drag as before to choose an appropriate area nearby to fill in the texture of the patch and blend it with the previously established color.)

The hole repaired and the crease eliminated with diligent use of the clone stamp and spot healing brush, the image is restored to its original splendor.

Type 2: Smart repair using imgkits

Compared with the manual use of photoshop software, the biggest advantage of imgkits is that you only need to upload photos. The artificial intelligence system will automatically identify the wrinkles, spots, missing, color and other defects of the uploaded photos, and the photos can be repaired in 1 minute.

Restoring Old Photos: Repairing Visual Damage

Type 1: Repair with photoshop

Photographers are always on the lookout for automated shortcuts, but in most cases the best results can’t be achieved without human input. Nowhere is that truer than when it comes to removing the dust, debris and damage that sullies many old photos.

The original antique family photo in need of serious repair.

The best way to repair such damage is to open the image in Photoshop and zoom in close. Then, take your time using tools such as the clone stamp, spot healing brush, patch tool and content-aware fill in order to eliminate wrinkles, spots and rips. This is the most tedious, time-consuming portion of the process, but it’s also the one that can really make a ravaged old print look new.

Start with the face and work out from there. Because faces are the center of attention, they deserve the most help. If you can make the faces blemish-free, you can get away with less-aggressive repairs elsewhere.

The spot-healing brush is ideal for repairing small blemishes. Set the brush diameter to be easily larger than most of the spots you’ll aim for, but not much larger. Experiment with the type of brush, choosing between content-aware, create texture and proximity match to see what works best in a given scenario.

In general, I find content-aware to perform best in this type of repair, and in fact it did the majority of the heavy lifting on the damaged old portrait shown here.

In some cases, the spot-healing brush will create a blurry spot. These can stand out almost as much as the original damage, so instead switch to the clone-stamp tool in order to copy one area of the image onto another. To use it, again set a brush diameter slightly larger than the areas being repaired and alt-click (or option-click) on a neighboring area of “good” detail to be cloned, then click and drag (or use multiple clicks) to copy the good area over the damage.

I generally prefer a soft brush edge as well as a brush set at 100% opacity and flow, all because this will generally blend in more seamlessly with the surroundings. I also regularly use the fade control to dial back an overly aggressive edit.

To change the brush size, shape and hardness, control-click on the image to bring up a dialogue box that makes these changes easy.

The clone-stamp tool is also especially good for repairing areas with distinctive shapes, textures or patterns. A crease that runs through a jacket, for instance, needs to carry the image information through the repair in order to blend in better. A harder-edged clone stamp excels here, while the spot healing brush typically does not.

Another tool that works very well for making clone-style repairs is the patch tool. It can be used to grab a bad spot and replace it with a good one—especially useful for fixing a large swath of background or clothing. To use it, click on the patch tool (found under the spot healing brush) and ensure it’s set to “content aware” in the options bar, then click and draw a selection around the area to be repaired.

The patch tool works wonders on backgrounds to quickly and effectively repair large areas full of spots and scratches without obliterating detail.

Then, click inside the selection and drag to the area of the image you’d like to replace it with. It’s like a selection-based version of the spot-healing brush that blends repairs with their surroundings. For large areas of the background in this antique portrait, the patch tool easily speeds up the process while making effective repairs.

Another way I like to make slightly larger fixes is to use the content-aware fill tool. To use it, make a selection and then choose Content-Aware Fill from the Edit menu to open up the dialogue box, which allows for adjustments to the fill, but the default settings are a good place to start.

Remember that with all of these tools, when it comes to general spot removal and cleanup, it doesn’t have to be perfect the first time. You can always make further passes at later stages, getting smaller and finer details covered as you go. For starters, though, the approach is to simply take your time and eliminate the biggest, most eye-catching blemishes.

After a few hours of spot healing, clone stamping and patching—as well as the use of a curves adjustment layer—this family heirloom is restored nearly to its original state.

Type 2: Smart repair using imgkits

Compared with the manual use of photoshop software, the biggest advantage of imgkits is that you only need to upload photos. The artificial intelligence system will automatically identify the wrinkles, spots, missing, color and other defects of the uploaded photos, and the photos can be repaired in 1 minute.