Restoring Old Photos: Repairing Visual Damage
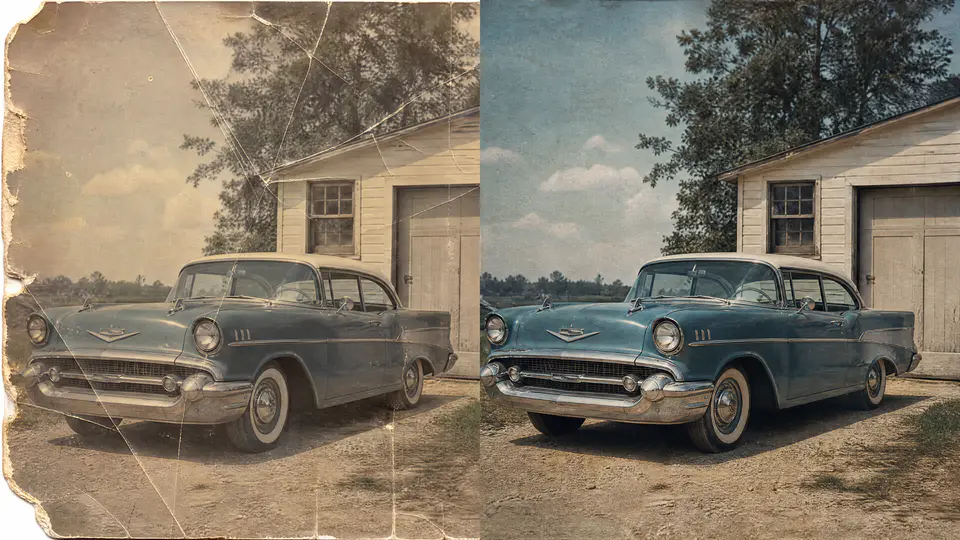
Type 1: Repair with photoshop

Photographers are always on the lookout for automated shortcuts, but in most cases the best results can’t be achieved without human input. Nowhere is that truer than when it comes to removing the dust, debris and damage that sullies many old photos.

The original antique family photo in need of serious repair.

The best way to repair such damage is to open the image in Photoshop and zoom in close. Then, take your time using tools such as the clone stamp, spot healing brush, patch tool and content-aware fill in order to eliminate wrinkles, spots and rips. This is the most tedious, time-consuming portion of the process, but it’s also the one that can really make a ravaged old print look new.

Start with the face and work out from there. Because faces are the center of attention, they deserve the most help. If you can make the faces blemish-free, you can get away with less-aggressive repairs elsewhere.

The spot-healing brush is ideal for repairing small blemishes. Set the brush diameter to be easily larger than most of the spots you’ll aim for, but not much larger. Experiment with the type of brush, choosing between content-aware, create texture and proximity match to see what works best in a given scenario.

In general, I find content-aware to perform best in this type of repair, and in fact it did the majority of the heavy lifting on the damaged old portrait shown here.

In some cases, the spot-healing brush will create a blurry spot. These can stand out almost as much as the original damage, so instead switch to the clone-stamp tool in order to copy one area of the image onto another. To use it, again set a brush diameter slightly larger than the areas being repaired and alt-click (or option-click) on a neighboring area of “good” detail to be cloned, then click and drag (or use multiple clicks) to copy the good area over the damage.

I generally prefer a soft brush edge as well as a brush set at 100% opacity and flow, all because this will generally blend in more seamlessly with the surroundings. I also regularly use the fade control to dial back an overly aggressive edit.

To change the brush size, shape and hardness, control-click on the image to bring up a dialogue box that makes these changes easy.

The clone-stamp tool is also especially good for repairing areas with distinctive shapes, textures or patterns. A crease that runs through a jacket, for instance, needs to carry the image information through the repair in order to blend in better. A harder-edged clone stamp excels here, while the spot healing brush typically does not.

Another tool that works very well for making clone-style repairs is the patch tool. It can be used to grab a bad spot and replace it with a good one—especially useful for fixing a large swath of background or clothing. To use it, click on the patch tool (found under the spot healing brush) and ensure it’s set to “content aware” in the options bar, then click and draw a selection around the area to be repaired.

The patch tool works wonders on backgrounds to quickly and effectively repair large areas full of spots and scratches without obliterating detail.

Then, click inside the selection and drag to the area of the image you’d like to replace it with. It’s like a selection-based version of the spot-healing brush that blends repairs with their surroundings. For large areas of the background in this antique portrait, the patch tool easily speeds up the process while making effective repairs.

Another way I like to make slightly larger fixes is to use the content-aware fill tool. To use it, make a selection and then choose Content-Aware Fill from the Edit menu to open up the dialogue box, which allows for adjustments to the fill, but the default settings are a good place to start.

Remember that with all of these tools, when it comes to general spot removal and cleanup, it doesn’t have to be perfect the first time. You can always make further passes at later stages, getting smaller and finer details covered as you go. For starters, though, the approach is to simply take your time and eliminate the biggest, most eye-catching blemishes.

After a few hours of spot healing, clone stamping and patching—as well as the use of a curves adjustment layer—this family heirloom is restored nearly to its original state.

Type 2: Smart repair using imgkits

Compared with the manual use of photoshop software, the biggest advantage of imgkits is that you only need to upload photos. The artificial intelligence system will automatically identify the wrinkles, spots, missing, color and other defects of the uploaded photos, and the photos can be repaired in 1 minute.