How to quickly get eCommerce product photos with white transparent background?

Today, everyone is using white transparent backgrounds for their product images. White backgrounds can make the products stand out and appear neater and more sophisticated. When buyers are browsing through product images, a white background can make buyers’ attention more focused on the product instead of being distracted by the background or other unnecessary details. E-commerce professionals believe that a clear white background can bring more sales to the product.

What makes a product picture with a white background so magical? Let’s analyze what are the advantages of pictures with white backgrounds.

1.Highlights the Product

Images are the key to online selling. Sellers must minimize visual elements in product images other than the product itself. Choosing a white background will avoid distraction and allow the buyers to focus on the product.

2.Promotes Consistency

“If you want to be taken seriously, be consistent.” Considering white background photography for the images on your product page can promote consistency. 

And consistency makes the customers feel that a brand is professional and trustworthy. Besides, product images look more organized with background removal or white background and allow the customers to browse through them easily.

3.Cost-Effective

Editing product images can be labor-intensive and expensive. It would cost you a lot to edit thousands of images for your website or eCommerce store. Although there is always an option to hire an in-house editor, it may be an impractical decision as product photos are only edited once and do not require any changes or modifications once uploaded. 

4.Optimizes and Minimizes the File Size

Another major benefit of having a white background is that it reduces the file size, making it easier to upload. Smaller file sizes can increase the website’s loading speed, apart from meeting the upload standards.

No doubt, a longer page load time can annoy the customers, and they may exit the website without making any purchase. It can also lead to decreased search ranking and consequent lost sales.

5.Makes the Product Look Clean

While you may think that customers prefer extravagance and complex product images, it is not true. In fact, potential buyers get dissuaded from purchasing when the product image is too distracting.

Using imgkits you can quickly remove the background of the product, you just need to click the button to upload a photo, imgkits will intelligently recognize the processing and erase the background of the uploaded photo to become a picture with a white transparent background, you can also do other colors to fill the background color, or fill other photos as the background to combine a new photo.

How to quickly delete unwanted people from photos?

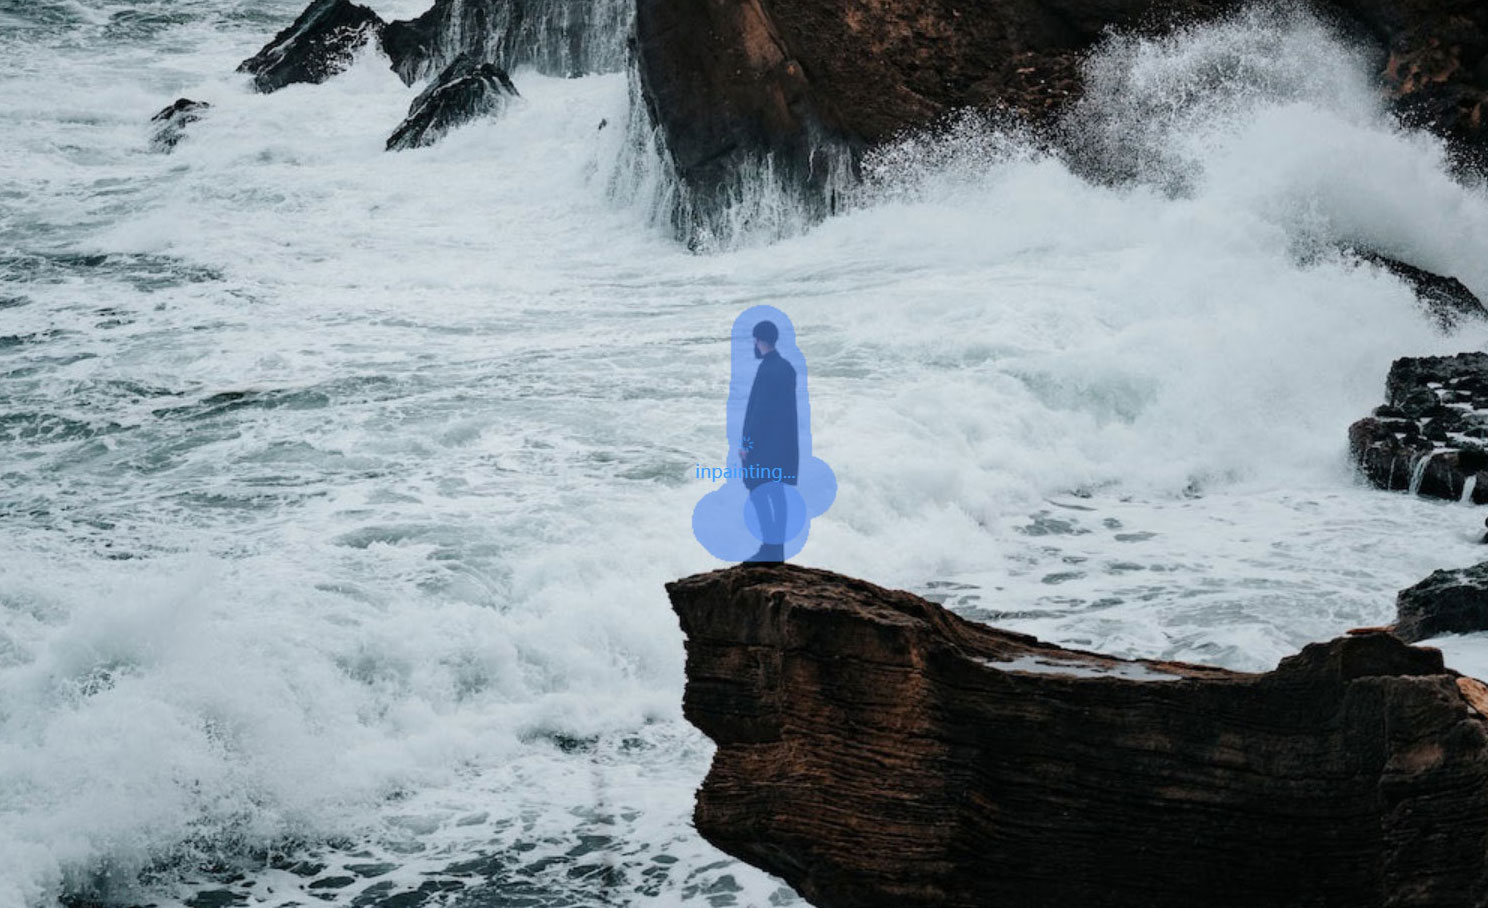
When traveling or taking photos in our daily life, we often encounter strangers intruding into the shot. Or maybe you took a picture with an ex-partner, ex-friend or someone who is no longer in your life for many reasons and now you don’t feel like it anymore. imgkits offers the “Remove tourists or other unwanted objects” feature to help you solve this problem perfectly. The “Remove tourists or other unwanted objects” function provided by imgkits can help you solve this problem perfectly, by quickly erasing the people you don’t want.

Step 1: Open into Imgkits and select ” Remove tourists or other unwanted objects “

Step 2: Click “Upload Image” and upload the photo of the person you need to erase

Step 3: Use the brush to mark the person to be erased, and the system will erase automatically after the erasure is completed

Brush smear marker

Click “Smear repair” on the left to adjust the brush size; click “Tick repair” on the left to switch to the lasso tool for drawing; click “Polygonal lasso” to switch to the polygonal lasso tool for drawing.

Finish removing the watermark

Click “Previous” above to undo the current operation and go back to the previous step; click “Next” to cancel the undo operation and go to the next step.

Step 4: Click “Download” in the upper right corner to download and save the watermarked photos; click “Re-Upload” to re-select the new images to upload

Effect

This is the step by step method to use imgkits to erase unwanted people from your photos, is it very easy? If your photo has more people and complex, you can paint the people area in several times, this will take more time but the final result will be better than you think, come and try it.

How to make blurry photos clear?

Whether it is a cell phone or a professional digital camera, when taking photos, the photos taken will be blurred and unclear due to the movement of the subject, improper camera grip or focusing errors. So what are the ways to make these blurred photos clear?

Method 1: Use imgkits’ image resolution enhancement function

Imgkits is a professional online image restoration and processing website with powerful intelligent AI image processing technology, with a variety of image restoration and processing functions, improving image resolution is one of them. What’s more is that you only need to upload a blurry photo and wait for 5 seconds to get a clear photo after processing quickly, you don’t need to have any image processing skills, it will also protect and delete all your uploaded items within 24 hours and no one can access and view them without your permission.

How to use Imgkits to enhance image resolution:

Step 1: Open into Imgkits and select “Increase Resolution of Image”

imgkits official website home page

Step 2: Click “Upload Image” and upload the photo you need to improve the resolution

Increase Resolution of Image

Step 3: Click “Download” in the upper right corner to download and save the clear image; click “Re-Upload” to re-select and upload a new image

Method 2: Use Photoshop for sharpening

Adobe Photoshop requires more skilled software operation skills, if you are a Photoshop enthusiast, then you can use it to improve the clarity of the image, if you have never touched it is not recommended, then you may need to spend a lot of time to get familiar with using it.

Step 1: Open the image in photoshop and convert it to a smart object

Step 2: Select the smart sharpening filter, adjust the sharpening and edges and other values

Step 3: Change the blending mode of the image to Brightness

Conclusion:

Through the above 2 methods we can see that Imgkits smart enhance image resolution is more simple and fast, can save us a lot of time, is a more simple and fast method.

How to quickly remove watermark marks from photos in 1 second?

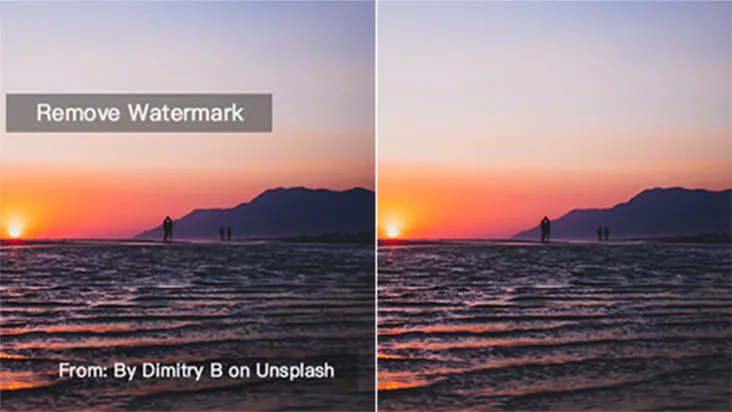
Imgkits can quickly remove all kinds of watermark marks from your photos with a simple upload and smear operation, without any professional image processing skills, so let’s learn it below.

Step 1: Open into Imgkits and select “Remove watermark from photo

imgkits official website home page

Step 2: Click “Upload Image” to upload a photo with watermark

Remove watermark from photo

Step 3: Use the brush to scribble marks on the watermark trace area, and the system will automatically erase the marked area

Brush smear marker

Click “Smear repair” on the left to adjust the brush size; click “Tick repair” on the left to switch to the lasso tool for drawing; click “Polygonal lasso” to switch to the polygonal lasso tool for drawing.

Finish removing the watermark

Click “Previous” above to undo the current operation and go back to the previous step; click “Next” to cancel the undo operation and go to the next step.

Step 4: Click “Download” in the upper right corner to download and save the watermarked photos; click “Re-Upload” to re-select the new images to upload.

Effect

The above is the step by step method to remove photo watermark using imgkits, is it very simple? If your picture watermark is more complicated, you can paint the watermark area in several times, so that although it takes more time, but the final effect will be better than you can imagine, come and try it.

Is photography really the art of using light?

We all know that photography is only possible when there is light, so light plays a rather important role in the success or failure of a photograph. Indoors we can use a variety of artificial light sources such as flashes and tubes to take photographs.

In a natural environment, however, we can make use of natural light to create an equally impressive shot without the help of artificial light. Natural light is the light from the sun hitting the earth. Here’s a quick look at some of my photography using natural light.

You will find that even if you are photographing the same subject, the results will vary from time to time, sometimes the image may appear harder, sometimes softer, or the colour of the image may be cooler at one time and warmer at another, all of which are related to natural light.

Characteristics of light for shooting throughout the day

① Early morning (soft, light in cool colours)

Dawn before sunrise, low-angle light scattered, mainly blue and cool tones, the intensity of light is very weak, the contrast of the scene is also weak. The sky is in an eerie blue at this time and the image has a soft, bluish, cool tone to it. As the moment of sunrise approaches, the brightness of the entire sky increases, and the sky near the horizon gradually changes from a cool blue, to a gradually brighter light and higher colour temperature as sunrise approaches, changing a little to a gradually warmer colour such as light pink and pink, a rapid and subtle change in colour and tone.

This is why the morning is generally a good time for us to shoot as a portrait, suitable for shooting some fresh subjects.

②High noon (hard light)

In travel or everyday photography, sometimes what is called “high noon” actually appears slowly half an hour after sunrise, when the clouds have cleared. The light at this time is top light, i.e. the direction of projection is perpendicular or almost perpendicular to the horizon, and the backlight area is heavily shadowed at this time. If you take a portrait in top light, it will cause severe shadows under deep-set eye sockets and protruding noses, creating a hard or even horrific effect, and portraits taken in this way often do not work well.

But if we make the most of some of the shadows to tone down the strong light ratios, it can often have a surprising effect.

Making full use of shade, sun hats and other ways to reduce the light pen on the face can effectively avoid “ghosting” on the model’s face while also increasing the sunlight dappled atmosphere. This is a great way to kill two birds with one stone.

In addition, by adjusting the pose of the model and your own camera position, you can also achieve a surprising effect.

The model can effectively avoid large light ratios on the face by burying her head and looking down at the POSE.

At the same time, we can also lower our camera position and use a low camera position to shoot upwards to achieve a backlight-like effect, which also effectively avoids the appearance of large light ratios on the face.

③Sunset (soft, with predominantly warm light)

The light at sunset is similar to sunrise in that it is low-angle, flat light, but it has a warmer effect. A backlit scene shows a sun that resembles an ‘egg yolk’ and will be covered in a golden hue. If you miss the sunrise during your trip because you have trouble getting up, sunset is undoubtedly the best time to take portraits because it is the ideal time to shoot light, with richly coloured clouds and a half hour after sunset, when the clouds are more colourful, gradually changing from warm to cool colours, making the hour before and after sunset a prime time to take portraits.

Backlighting at sunset can give a very strong and beautiful atmosphere, making our work even more beautiful and romantic.

A soft sunset can give the model’s face a sense of dimension and thus better portray the emotion being expressed.

So as you can see, it is not only in artificial light that you can produce great light portraits. As long as we use all kinds of natural light wisely, we can also produce excellent light and shadow portraits.

imgkits online smart photo processing tool can quickly beautify and repair the photos you take, remove all kinds of watermarks mark defects, smart beautify and repair, is the best tool for photo post-processing.

How to restore faded photos in 10 seconds?

Sun fading is a common issue when displaying our favourite photos that are exposed to sunlight, over time it will damage the photo. Here is a 4 step guide: How to restore a sun faded photo.

Type 1: Repair with photoshop

1. Equalise the tones

The first step is to equalise the tonal range. Start by adding a black and white adjustment layer and then isolating the faded area with a selection. By viewing the Channels in Photoshop you see the colour separations and where the problem areas lie. Working with one Channel at a time, adjust the levels to equalise the tones to match those outside of the faded area. Now turn off the black and white adjustment layer.

2. Fix the discolouration

Next is to reapply colour tones to make the photo look natural once again. This can be done by adding colour tones to a combination of layers set to ‘Colour’ and ‘Soft Light’. A good tip is to sample the colours outside of the faded area, the aim here is to match the colours as close as you can.

3. Remove the halo effect

With the tonal and colour fading fixed, the last step is to remove the halo effect around the window area. Make a copy of your layer group and merge the copy into a single layer.  Using the Clone Stamp and Healing tools blend out the halo line.

4. Finishing touches

For some finishing touches, you may need to sharpen the overall image and do some Level and Colour Balance adjustments.

Type 2: Smart repair using imgkits

It is recommended to use imgkits to repair faded photos after sun exposure. imgkits has powerful intelligent photo processing technology. It only takes one minute to repair damaged, faded, yellowed, spotted, elongated, blurred, and distorted photos, and restore the original appearance of the photo.

Restoring Faded Color Photos

Type 1: Repair with photoshop

First, I open the image in Photoshop in order to address the color. Start by duplicating the image to a new layer so it’s easy to toggle the repaired layer on and off to check your progress and ultimately to more effectively blend the repaired image with the original if necessary.

I start my color repair with the simplest approach: using the Auto Color option under the Image menu. In my experience, this technique almost always makes a notable improvement, and frequently it’s all but perfect. With the example here, the Auto Color adjustment worked terrifically. For further fine-tuning or if Auto Color simply isn’t cutting it, I suggest using a Hue/Saturation adjustment layer. This allows you to tweak individual colors, dialing down green for instance, or increasing the saturation in whatever colors need it.

The final step for almost any color adjustment is dialing in the black point. This can be done easily with a Levels adjustment layer.

Click the top eyedropper in the adjustment layer window to activate the Black Point selection tool. Then, click on an area in the image that should be pure black, and watch as the adjustment layer automatically bases the black point on that selection. The middle eyedropper is for setting a gray point, which isn’t as crucial in my experience, but the third eyedropper is. It’s the white point eyedropper. Click this, then click on an area in the scene that should be pure white, and Photoshop will make it so.

Your image will likely have a much more pleasing contrast and saturation at this point, which can be further tweaked by grabbing the black point slider at the left of the histogram in the Levels adjustment layer panel. Here, you can dial the black level down even further or grab the slider at the right end of the histogram to bring down the highlights. You can watch the histogram for clues, too. If either end of the histogram shows a gap between the nearest peak and the edge of the frame, your black and white points are likely off. To repair this, click and drag to manually set new black and white points at the edges of those peaks.

Type 2: Smart repair using imgkits

Compared with using photoshop software manually, imgkits only requires you to upload photos with your fingers. The artificial intelligence system will automatically recognize the wrinkles, spots, missing, color and other defects of the photos, and it can repair and restore old photos in 1 minute.

Restoring Accurate Color of old photos

While very old black-and-white photos are more susceptible to damage than fading, color photos typically require a different type of restoration. Even when stored in ideal conditions, the organic dyes in color prints simply break down over time and cause color shifts. Not only are the colors typically not as vibrant as they once were, but also color shifts to magenta, blue or other colors also occur. And while working with color repairs can sometimes be frustrating, it can also be one of the simplest fixes as Photoshop’s automatic contrast and color controls can go a long way to making faded color photos look great.

This family photo is no antique, but it’s still in need of serious restoration—not due to damage but due to the fading that naturally happens to color prints over time.

Type 1: Repair with photoshop

The simplest fix is Auto Color, found under the Image menu. Click it, and Photoshop will analyze the scene and attempt to correct the color balance. In the best-case scenario, this fix looks great, and it’s all the repair that’s needed. In the worst-case scenario, though, it looks terrible and should be immediately undone (command+z). More often, it makes for some improvement, requiring further manual adjustment by eye.

Do note that in an image such as the example shown here, the white background of the scanner is interpreted by Photoshop to be the white level in the image. So, in order to make a more accurate automatic adjustment, select just the image area of the original with no white scanner background. This way Photoshop will establish the color and contrast based solely on the print.

To use Photoshop’s Auto Color adjustment more effectively, first make a selection to isolate the image area from the bright white edges of the scanner backing. This will tell Photoshop to establish the true white level based on the faded paper in the print.

To put the finishing touches on color, use the Color Balance and Hue/Saturation Adjustment Layers. For simple shifts, color balance is an easy way to adjust sliders to add or subtract from an overall cast. For more control, try the Hue/Saturation adjustment and choose Master in the dropdown of the Properties palette to change overall hue and saturation across the scene, or switch to one of the individual colors (reds, yellows, greens, cyans, blues, magentas) and adjust the saturation, luminosity and saturation of any specific color found in the scene. To eliminate a magenta cast, for instance, dial down the magenta saturation slider. If you’re unsure of exactly what slider might work best, click on the finger icon in the Properties palette to then click and drag on any color in the scene, and Photoshop will adjust the corresponding sliders.

The Curves adjustment layer makes tremendous strides in restoring not only color but contrast. Using the black point eyedropper, click on an area of the image that should be established as pure black. Then use the white point eyedropper for white and, should you choose to go further, the gray point eyedropper to set middle gray.

Finishing Touches When Restoring Old Photos

The image should now look all but perfect. For the finishing touches, consider adjusting the contrast with a Curves adjustment layer, whether you’re working with a color or black-and-white image. When the Properties palette opens (after clicking on the Curves adjustment layer icon in the Adjustments palette), click on the black point eyedropper near the top of the window. Then, click on the darkest area in the scene to tell Photoshop this tone should be black. Then, choose the white point eyedropper and click the lightest portion of the scene to set the white point. This will also help eliminate some color cast as well, and if these adjustments appear too heavy-handed, simply dial back the layer’s opacity in the Layers palette.

To help sharpen an image that wasn’t perfectly in focus in the first place, duplicate the color-corrected image onto a new layer and use the High Pass filter to create a map of the contrast edges in the scene, then change the layer mode to Overlay and use a layer mask to selectively add sharpness to only the areas most in need—such as the faces of the women shown here. Too much sharpening will amplify grain and other issues in the print, so it’s best to keep it subtle and isolate the sharpening to only the most necessary places.

If the image needs sharpening, try a high pass layer. Copy the image to a new layer and then choose Filter>Other>High Pass. Use the radius slider that appears to dial the resulting sharpness up or down, based on which edges become visible in the preview. Aim for the appearance of minimal detail in order to avoid oversharpening, click OK to render the filter, then change the layer mode of this high pass layer to Overlay. This hides all the gray portions of the layer and effectively sharpens the edges. Dialing down the layer’s opacity pulls back on this sharpening effect.

The final image after color correction and sharpening.

Type 2: Smart repair using imgkits

Compared with the manual use of photoshop software, the biggest advantage of imgkits is that you only need to upload photos. The artificial intelligence system will automatically identify the wrinkles, spots, missing, color and other defects of the uploaded photos, and the photos can be repaired in 1 minute.

how to Filling Voids In Old Photos?

If your photograph is unfortunately damaged by a large gap or hole, as in the missing corner shown in the image below, you’ll have to perform some reconstructive surgery. The larger the void and the more detail surrounding it, the trickier the reconstruction will be. You can certainly fall back on cropping as a crutch in order to minimize the opening—depending on its location, of course. But if you’re lucky, the missing area will be in a background or piece of clothing that is at least manageably repairable.

This vintage photo is in generally good condition with the exception of one prominent crease through the center of the frame and a large hole where the corner has gone missing.

Type 1: Repair with photoshop

To start, make a selection from a nearby area that is appropriate to fill in the void. If you’re replacing with trees and shrubs, copy from an area of trees and shrubs. If you’re replacing part of a garment, select from another area of the garment. Copy the selection to a new layer, move it into place over the gap, and use the Transform tool (found under the Edit menu) to rotate, resize and shape the element to fit appropriately over the hole. Then, use the Patch tool (be sure it’s set to Content-Aware and Sample All Layers) overlapping the edges of the patch in order to make it blend seamlessly into the background. This generally does a great job of softening the hard edges from the copy/paste patch.

o repair the void in the corner, start by selecting an appropriate area nearby, then copying and pasting it over the void.
Using the patch tool set to sample all layers, the rectangular patch can be seamlessly blended into the image to cover up the hole.

Another way to fill gaps in the image is with the Paint Bucket. This approach works best if you’re repairing a portion of the image without many changes in shape, texture or detail.

To use it, start with the lasso tool to draw a selection around the void, then activate the Paint Bucket and option-click (or alt-click) to select an appropriate color from a nearby area of the image. Click inside the selection to fill it with the paint color, then again switch to the patch tool. Ensure it is still set to Content Aware mode in the Options bar. (If the Options bar does not show by default at the top of the Photoshop window, turn it on under the Window menu by clicking on Options so that a checkmark appears. Then, click and drag as before to choose an appropriate area nearby to fill in the texture of the patch and blend it with the previously established color.)

The hole repaired and the crease eliminated with diligent use of the clone stamp and spot healing brush, the image is restored to its original splendor.

Type 2: Smart repair using imgkits

Compared with the manual use of photoshop software, the biggest advantage of imgkits is that you only need to upload photos. The artificial intelligence system will automatically identify the wrinkles, spots, missing, color and other defects of the uploaded photos, and the photos can be repaired in 1 minute.

Restoring Old Photos: Repairing Visual Damage

Type 1: Repair with photoshop

Photographers are always on the lookout for automated shortcuts, but in most cases the best results can’t be achieved without human input. Nowhere is that truer than when it comes to removing the dust, debris and damage that sullies many old photos.

The original antique family photo in need of serious repair.

The best way to repair such damage is to open the image in Photoshop and zoom in close. Then, take your time using tools such as the clone stamp, spot healing brush, patch tool and content-aware fill in order to eliminate wrinkles, spots and rips. This is the most tedious, time-consuming portion of the process, but it’s also the one that can really make a ravaged old print look new.

Start with the face and work out from there. Because faces are the center of attention, they deserve the most help. If you can make the faces blemish-free, you can get away with less-aggressive repairs elsewhere.

The spot-healing brush is ideal for repairing small blemishes. Set the brush diameter to be easily larger than most of the spots you’ll aim for, but not much larger. Experiment with the type of brush, choosing between content-aware, create texture and proximity match to see what works best in a given scenario.

In general, I find content-aware to perform best in this type of repair, and in fact it did the majority of the heavy lifting on the damaged old portrait shown here.

In some cases, the spot-healing brush will create a blurry spot. These can stand out almost as much as the original damage, so instead switch to the clone-stamp tool in order to copy one area of the image onto another. To use it, again set a brush diameter slightly larger than the areas being repaired and alt-click (or option-click) on a neighboring area of “good” detail to be cloned, then click and drag (or use multiple clicks) to copy the good area over the damage.

I generally prefer a soft brush edge as well as a brush set at 100% opacity and flow, all because this will generally blend in more seamlessly with the surroundings. I also regularly use the fade control to dial back an overly aggressive edit.

To change the brush size, shape and hardness, control-click on the image to bring up a dialogue box that makes these changes easy.

The clone-stamp tool is also especially good for repairing areas with distinctive shapes, textures or patterns. A crease that runs through a jacket, for instance, needs to carry the image information through the repair in order to blend in better. A harder-edged clone stamp excels here, while the spot healing brush typically does not.

Another tool that works very well for making clone-style repairs is the patch tool. It can be used to grab a bad spot and replace it with a good one—especially useful for fixing a large swath of background or clothing. To use it, click on the patch tool (found under the spot healing brush) and ensure it’s set to “content aware” in the options bar, then click and draw a selection around the area to be repaired.

The patch tool works wonders on backgrounds to quickly and effectively repair large areas full of spots and scratches without obliterating detail.

Then, click inside the selection and drag to the area of the image you’d like to replace it with. It’s like a selection-based version of the spot-healing brush that blends repairs with their surroundings. For large areas of the background in this antique portrait, the patch tool easily speeds up the process while making effective repairs.

Another way I like to make slightly larger fixes is to use the content-aware fill tool. To use it, make a selection and then choose Content-Aware Fill from the Edit menu to open up the dialogue box, which allows for adjustments to the fill, but the default settings are a good place to start.

Remember that with all of these tools, when it comes to general spot removal and cleanup, it doesn’t have to be perfect the first time. You can always make further passes at later stages, getting smaller and finer details covered as you go. For starters, though, the approach is to simply take your time and eliminate the biggest, most eye-catching blemishes.

After a few hours of spot healing, clone stamping and patching—as well as the use of a curves adjustment layer—this family heirloom is restored nearly to its original state.

Type 2: Smart repair using imgkits

Compared with the manual use of photoshop software, the biggest advantage of imgkits is that you only need to upload photos. The artificial intelligence system will automatically identify the wrinkles, spots, missing, color and other defects of the uploaded photos, and the photos can be repaired in 1 minute.