How to quickly delete unwanted people from photos?

When traveling or taking photos in our daily life, we often encounter strangers intruding into the shot. Or maybe you took a picture with an ex-partner, ex-friend or someone who is no longer in your life for many reasons and now you don’t feel like it anymore. imgkits offers the “Remove tourists or other unwanted objects” feature to help you solve this problem perfectly. The “Remove tourists or other unwanted objects” function provided by imgkits can help you solve this problem perfectly, by quickly erasing the people you don’t want.

Step 1: Open into Imgkits and select ” Remove tourists or other unwanted objects “

Step 2: Click “Upload Image” and upload the photo of the person you need to erase

Step 3: Use the brush to mark the person to be erased, and the system will erase automatically after the erasure is completed

Brush smear marker

Click “Smear repair” on the left to adjust the brush size; click “Tick repair” on the left to switch to the lasso tool for drawing; click “Polygonal lasso” to switch to the polygonal lasso tool for drawing.

Finish removing the watermark

Click “Previous” above to undo the current operation and go back to the previous step; click “Next” to cancel the undo operation and go to the next step.

Step 4: Click “Download” in the upper right corner to download and save the watermarked photos; click “Re-Upload” to re-select the new images to upload

Effect

This is the step by step method to use imgkits to erase unwanted people from your photos, is it very easy? If your photo has more people and complex, you can paint the people area in several times, this will take more time but the final result will be better than you think, come and try it.

How to quickly remove watermark marks from photos in 1 second?

Imgkits can quickly remove all kinds of watermark marks from your photos with a simple upload and smear operation, without any professional image processing skills, so let’s learn it below.

Step 1: Open into Imgkits and select “Remove watermark from photo

imgkits official website home page

Step 2: Click “Upload Image” to upload a photo with watermark

Remove watermark from photo

Step 3: Use the brush to scribble marks on the watermark trace area, and the system will automatically erase the marked area

Brush smear marker

Click “Smear repair” on the left to adjust the brush size; click “Tick repair” on the left to switch to the lasso tool for drawing; click “Polygonal lasso” to switch to the polygonal lasso tool for drawing.

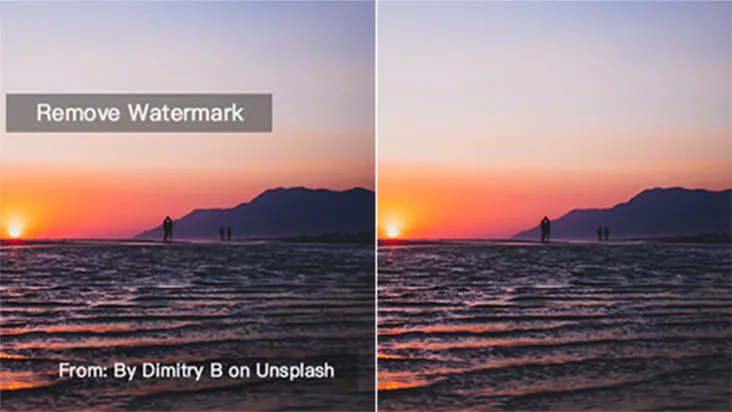
Finish removing the watermark

Click “Previous” above to undo the current operation and go back to the previous step; click “Next” to cancel the undo operation and go to the next step.

Step 4: Click “Download” in the upper right corner to download and save the watermarked photos; click “Re-Upload” to re-select the new images to upload.

Effect

The above is the step by step method to remove photo watermark using imgkits, is it very simple? If your picture watermark is more complicated, you can paint the watermark area in several times, so that although it takes more time, but the final effect will be better than you can imagine, come and try it.

Intelligently remove the watermark and repair the picture without any trace!

Traditional watermarking methods may provide various methods such as fuzzy, dynamic fuzzy, corrosion, mosaic, frosted, and grid formats. It is also possible to use the average value of the surrounding image pixels, but it is nothing more than rigid, and it is easy to see the traces, which is very unnatural.

The following picture is an example

We use the traditional method to erase the characters in the upper right corner, and the average pixel value of the surrounding pictures

It can be seen that the traces are very obvious

Using Inpaint, you can recover some of the lost photos in a few seconds. Replace any missing, deteriorated or unwanted parts of the picture, it will automatically recognize the surrounding environment and perform intelligent filling, so that the repaired picture can easily remove the defects without any trace.

Screenshot demo

First wipe the area to be removed

Click “Start Repair

I can hardly see it anymore, the ripples on the water have even reappeared!

How To Repair Scratches, Tears, and Spots on an Old Photo

As digital photography becomes more and more popular, many people turn their old paper photos to digital form to store and view them on modern computers. Nevertheless, old photos are not always in the perfect condition: tears, spots and cracks remain even on electronic pictures.

Inpaint fixes this problem by providing a simple way to remove various defects from old photos in merely two steps.

Step 1: Enter the inpaint old photo page

Step 2: Click the upload image button to select the scanned

Step 3: Wait for the system to process automatically

Wait a few seconds, the system will automatically process the scratches, tears and spots of the photos, and enter the effect preview page, and you can choose to save the repaired photos to the computer or mobile phone.

Erase Power Lines from a Photo without any graphics skills

Sometimes power lines crossing the composition spoil an otherwise perfect photo. An exciting gothic temple, a beautiful mountain panorama, or a gripping night cityscape slashed by ugly wires hanging in the air can be upsetting. Indeed, we rarely have a chance to revisit those places to take another shot, and often we just can’t choose better perspective to render the power lines invisible.

With Inpaint, erasing power lines from a photo is easy as clicking a switch!

Step 1: Open the photo with Inpaint

Step 2: Use the Marker tool to select power lines

Use the tool to select the power lines you want to erase,Smear and cover the power cord and object to be removed, as shown in the figure below.

Step 3: Run the restoration process

With Inpaint the entire process takes as little as 1 minute, and you don’t need any specific knowledge or tools!

Remove people from photo: the easy way

We all have photographs with unwanted visitors. Perhaps it was impossible to take a picture of the view without someone walking in front of your camera. Maybe you didn’t notice the person’s head until you got home. Or possibly you couldn’t even see the person walking in the background, spoiling that otherwise perfect shot.

The good news is that there are many solutions for removing people from your photo, but most, unfortunately, are complicated to use and expensive.

Inpaint makes quick and easy work of removing people from your photographs with incredible ease.

Step 1: Load the image with the unwanted people

The scenery is spectacular, but unwanted people in the foreground spoil the picture. Get ready to remove the people from the photo!

Step 2: Select the people to remove

If required, zoom in to the people you wish to take out of the picture. Then simply drag the marker over the people you wish to remove – that’s it. No need for fiddling around with great precision – let the software take care of the finer details for you.

Step 3: Unwanted people are magically removed!

One click of the mouse and the unwanted people vanish before your eyes – that’s it. It really is that simple!

Step 4: Clean up any other people you wish to remove

Repeat the above steps to quickly and easily remove other people from the photo.

Step 5: Enjoy your perfect people-free photo!

All the people have been removed in less than two minutes! It couldn’t be simpler or more effective.

Effectively Remove Shadow from a Photo

Have you ever taken a perfect photo, except for some shadows (or dark patches) that spoil everything? In digital photography, with the right editing tools things can be improved with just a few clicks.

What you’ll need to remove shadows from an image is the Inpaint photo editing software.

Step 1: Open the photo with a shadow in Inpaint

Step 2: Use the Marker tool to select a shadow area

Switch to the Marker tool on the toolbar and select the shadow area. Note that you can adjust the precise size of the marker for fine selection.

Step 3: Run the shadow removal process

Finally, run the restoration process – just click the ‘Erase’ button. Inpaint will remove the shadow and other imperfections from your photo.

How to Erase Wrinkles, Pimples and Skin Blemishes

We all are not ideal. Yet we all sometimes want to look a bit more ideal than in real life. Dating websites, family and prom albums, resumes are certainly places where skin blemishes or pimples are not welcome. So how would you conceal that nasty pimple or redness on the face? Tons of makeup? There’s a better option – Inpaint!

With Inpaint you can easily retouch a photo and momentarily disguise various skin defects, even the worst of them. Here is how this can be done:

Step 1: Open a problematic photo

Step 2: Select skin defects

Select pimples, wrinkles and other skin blemishes using the Marker tool, Adjust the size of the Marker for more precise selection.

Step 3: See them disappear

Run the retouching process and watch the face becomes clearer, younger, and more attractive!

One Simple Way to Remove Date Stamps on Photos

Many digital cameras are set to mark photos they make with date stamps. While otherwise a convenient option helping to sort out images, sometimes you simply don’t want to display the date nor do you want to spoil the photo itself with unnecessary labels. So how do you remove a date stamp from a picture? We suggest using Inpaint for that, an online date stamp remover.

The tool automatically processes the image and restores the pixels based on what’s around the date stamp label. Here is how the entire procedure looks like.

Step 1: Upload the photo

Upload the image you want to erase date stamps from..

Step 2: Select the stamp

With the marker tool on the toolbar select the timestamp, like shown below. Try to not go too far beyond the borders of the actual stamp. Switch to a smaller size of the marker if you need more precise selection.

Step 3: Remove the date stamp from the photo

Click Erase to instruct Inpaint to process the image. Within a short timeout you should see the date or time stamp is gone.

How to Remove Watermark from a Photo

Watermarks. An efficient copyright protection mechanism and a pain in the neck when it comes to restoring the intact image from the watermarked one. Removing a watermark from a photo comes in handy when you lost the last remaining copy of the original picture and desperately need to return it no matter what.

Now take Inpaint and remove any number of watermarks from your photos in just 3 steps, regardless of whether the photo is on your desktop or on mobile phone!

Step 1: Upload the image

Click the Upload button and select the picture you want to remove a watermark from.

Step 2: Highlight watermarks to remove

Use the marker to highlight the area of the watermark you want to remove. Note that you can make finer selection of the areas by choosing smaller size of the marker.

Step 3: Remove them!

Finally, click the “Run” button to make Inpaint process the image and remove the watermark you defined.