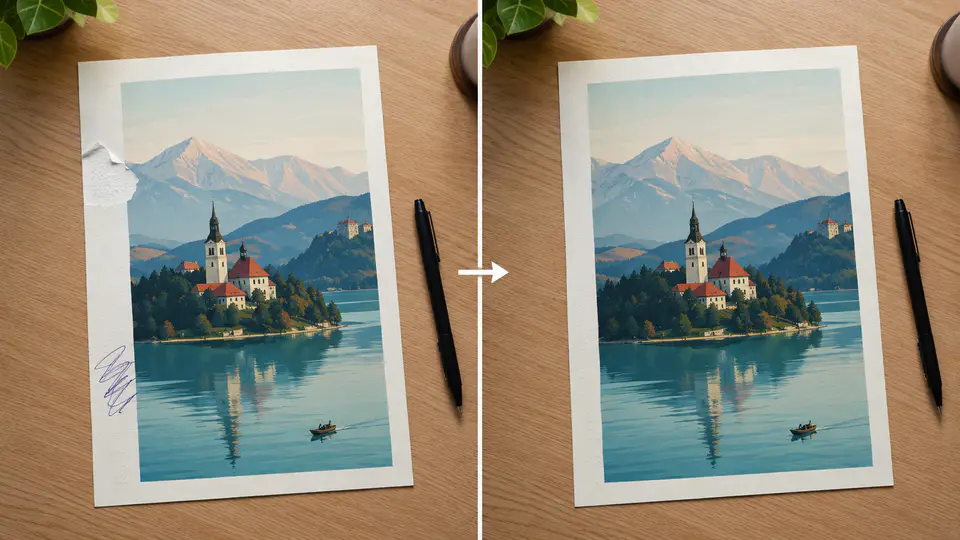
How to remove photo background in 2 seconds online?

(Works great even if you don’t know how to use Photoshop and other tools)

With all the photographry resources available today, snapping shots is easier than ever before. Taking a picture is as easy as pressing a button on your smartphone. You can even apply effects and artistic filters to the result. And all this is great for posting photos on Instagram. But what if you need more? What if you want to upload the photo to a serious website, or to attach it to a resume, or to use it as a corporate profile picture? You’re going to need a better background for your photograph.

Here you run into a problem: your photo has a bad or ruined background that you need to get rid of, but you don’t know how to work with Photoshop or Gimp, and even Picasa is too much for you. What to do? Use imgkits.com! This online photo editing tool removes the background of an image in the blink of an eye.

Here is the easiest way to cutout the background from your photographs:

Step 1: Open imgkits online.

Step 2: find the Remove Backgound section and click the Upload Image. Select the local image you want to strip the background from and upload it. Done!

Step 3: Wait for 2 seconds and imgkits can automatically remove the background of the image, click the Save button and save the result as a PNG file.

It’s easy, isn’t it? This feature of imgkits allows you to remove the background of the portrait, replace it with a transparent or solid color background, or with another background image.

How to restore faded photos in 10 seconds?

Sun fading is a common issue when displaying our favourite photos that are exposed to sunlight, over time it will damage the photo. Here is a 4 step guide: How to restore a sun faded photo.

Type 1: Repair with photoshop

1. Equalise the tones

The first step is to equalise the tonal range. Start by adding a black and white adjustment layer and then isolating the faded area with a selection. By viewing the Channels in Photoshop you see the colour separations and where the problem areas lie. Working with one Channel at a time, adjust the levels to equalise the tones to match those outside of the faded area. Now turn off the black and white adjustment layer.

2. Fix the discolouration

Next is to reapply colour tones to make the photo look natural once again. This can be done by adding colour tones to a combination of layers set to ‘Colour’ and ‘Soft Light’. A good tip is to sample the colours outside of the faded area, the aim here is to match the colours as close as you can.

3. Remove the halo effect

With the tonal and colour fading fixed, the last step is to remove the halo effect around the window area. Make a copy of your layer group and merge the copy into a single layer.  Using the Clone Stamp and Healing tools blend out the halo line.

4. Finishing touches

For some finishing touches, you may need to sharpen the overall image and do some Level and Colour Balance adjustments.

Type 2: Smart repair using imgkits

It is recommended to use imgkits to repair faded photos after sun exposure. imgkits has powerful intelligent photo processing technology. It only takes one minute to repair damaged, faded, yellowed, spotted, elongated, blurred, and distorted photos, and restore the original appearance of the photo.

Restoring Faded Color Photos

Type 1: Repair with photoshop

First, I open the image in Photoshop in order to address the color. Start by duplicating the image to a new layer so it’s easy to toggle the repaired layer on and off to check your progress and ultimately to more effectively blend the repaired image with the original if necessary.

I start my color repair with the simplest approach: using the Auto Color option under the Image menu. In my experience, this technique almost always makes a notable improvement, and frequently it’s all but perfect. With the example here, the Auto Color adjustment worked terrifically. For further fine-tuning or if Auto Color simply isn’t cutting it, I suggest using a Hue/Saturation adjustment layer. This allows you to tweak individual colors, dialing down green for instance, or increasing the saturation in whatever colors need it.

The final step for almost any color adjustment is dialing in the black point. This can be done easily with a Levels adjustment layer.

Click the top eyedropper in the adjustment layer window to activate the Black Point selection tool. Then, click on an area in the image that should be pure black, and watch as the adjustment layer automatically bases the black point on that selection. The middle eyedropper is for setting a gray point, which isn’t as crucial in my experience, but the third eyedropper is. It’s the white point eyedropper. Click this, then click on an area in the scene that should be pure white, and Photoshop will make it so.

Your image will likely have a much more pleasing contrast and saturation at this point, which can be further tweaked by grabbing the black point slider at the left of the histogram in the Levels adjustment layer panel. Here, you can dial the black level down even further or grab the slider at the right end of the histogram to bring down the highlights. You can watch the histogram for clues, too. If either end of the histogram shows a gap between the nearest peak and the edge of the frame, your black and white points are likely off. To repair this, click and drag to manually set new black and white points at the edges of those peaks.

Type 2: Smart repair using imgkits

Compared with using photoshop software manually, imgkits only requires you to upload photos with your fingers. The artificial intelligence system will automatically recognize the wrinkles, spots, missing, color and other defects of the photos, and it can repair and restore old photos in 1 minute.

Restoring Accurate Color of old photos

While very old black-and-white photos are more susceptible to damage than fading, color photos typically require a different type of restoration. Even when stored in ideal conditions, the organic dyes in color prints simply break down over time and cause color shifts. Not only are the colors typically not as vibrant as they once were, but also color shifts to magenta, blue or other colors also occur. And while working with color repairs can sometimes be frustrating, it can also be one of the simplest fixes as Photoshop’s automatic contrast and color controls can go a long way to making faded color photos look great.

This family photo is no antique, but it’s still in need of serious restoration—not due to damage but due to the fading that naturally happens to color prints over time.

Type 1: Repair with photoshop

The simplest fix is Auto Color, found under the Image menu. Click it, and Photoshop will analyze the scene and attempt to correct the color balance. In the best-case scenario, this fix looks great, and it’s all the repair that’s needed. In the worst-case scenario, though, it looks terrible and should be immediately undone (command+z). More often, it makes for some improvement, requiring further manual adjustment by eye.

Do note that in an image such as the example shown here, the white background of the scanner is interpreted by Photoshop to be the white level in the image. So, in order to make a more accurate automatic adjustment, select just the image area of the original with no white scanner background. This way Photoshop will establish the color and contrast based solely on the print.

To use Photoshop’s Auto Color adjustment more effectively, first make a selection to isolate the image area from the bright white edges of the scanner backing. This will tell Photoshop to establish the true white level based on the faded paper in the print.

To put the finishing touches on color, use the Color Balance and Hue/Saturation Adjustment Layers. For simple shifts, color balance is an easy way to adjust sliders to add or subtract from an overall cast. For more control, try the Hue/Saturation adjustment and choose Master in the dropdown of the Properties palette to change overall hue and saturation across the scene, or switch to one of the individual colors (reds, yellows, greens, cyans, blues, magentas) and adjust the saturation, luminosity and saturation of any specific color found in the scene. To eliminate a magenta cast, for instance, dial down the magenta saturation slider. If you’re unsure of exactly what slider might work best, click on the finger icon in the Properties palette to then click and drag on any color in the scene, and Photoshop will adjust the corresponding sliders.

The Curves adjustment layer makes tremendous strides in restoring not only color but contrast. Using the black point eyedropper, click on an area of the image that should be established as pure black. Then use the white point eyedropper for white and, should you choose to go further, the gray point eyedropper to set middle gray.

Finishing Touches When Restoring Old Photos

The image should now look all but perfect. For the finishing touches, consider adjusting the contrast with a Curves adjustment layer, whether you’re working with a color or black-and-white image. When the Properties palette opens (after clicking on the Curves adjustment layer icon in the Adjustments palette), click on the black point eyedropper near the top of the window. Then, click on the darkest area in the scene to tell Photoshop this tone should be black. Then, choose the white point eyedropper and click the lightest portion of the scene to set the white point. This will also help eliminate some color cast as well, and if these adjustments appear too heavy-handed, simply dial back the layer’s opacity in the Layers palette.

To help sharpen an image that wasn’t perfectly in focus in the first place, duplicate the color-corrected image onto a new layer and use the High Pass filter to create a map of the contrast edges in the scene, then change the layer mode to Overlay and use a layer mask to selectively add sharpness to only the areas most in need—such as the faces of the women shown here. Too much sharpening will amplify grain and other issues in the print, so it’s best to keep it subtle and isolate the sharpening to only the most necessary places.

If the image needs sharpening, try a high pass layer. Copy the image to a new layer and then choose Filter>Other>High Pass. Use the radius slider that appears to dial the resulting sharpness up or down, based on which edges become visible in the preview. Aim for the appearance of minimal detail in order to avoid oversharpening, click OK to render the filter, then change the layer mode of this high pass layer to Overlay. This hides all the gray portions of the layer and effectively sharpens the edges. Dialing down the layer’s opacity pulls back on this sharpening effect.

The final image after color correction and sharpening.

Type 2: Smart repair using imgkits

Compared with the manual use of photoshop software, the biggest advantage of imgkits is that you only need to upload photos. The artificial intelligence system will automatically identify the wrinkles, spots, missing, color and other defects of the uploaded photos, and the photos can be repaired in 1 minute.

how to Filling Voids In Old Photos?

If your photograph is unfortunately damaged by a large gap or hole, as in the missing corner shown in the image below, you’ll have to perform some reconstructive surgery. The larger the void and the more detail surrounding it, the trickier the reconstruction will be. You can certainly fall back on cropping as a crutch in order to minimize the opening—depending on its location, of course. But if you’re lucky, the missing area will be in a background or piece of clothing that is at least manageably repairable.

This vintage photo is in generally good condition with the exception of one prominent crease through the center of the frame and a large hole where the corner has gone missing.

Type 1: Repair with photoshop

To start, make a selection from a nearby area that is appropriate to fill in the void. If you’re replacing with trees and shrubs, copy from an area of trees and shrubs. If you’re replacing part of a garment, select from another area of the garment. Copy the selection to a new layer, move it into place over the gap, and use the Transform tool (found under the Edit menu) to rotate, resize and shape the element to fit appropriately over the hole. Then, use the Patch tool (be sure it’s set to Content-Aware and Sample All Layers) overlapping the edges of the patch in order to make it blend seamlessly into the background. This generally does a great job of softening the hard edges from the copy/paste patch.

o repair the void in the corner, start by selecting an appropriate area nearby, then copying and pasting it over the void.
Using the patch tool set to sample all layers, the rectangular patch can be seamlessly blended into the image to cover up the hole.

Another way to fill gaps in the image is with the Paint Bucket. This approach works best if you’re repairing a portion of the image without many changes in shape, texture or detail.

To use it, start with the lasso tool to draw a selection around the void, then activate the Paint Bucket and option-click (or alt-click) to select an appropriate color from a nearby area of the image. Click inside the selection to fill it with the paint color, then again switch to the patch tool. Ensure it is still set to Content Aware mode in the Options bar. (If the Options bar does not show by default at the top of the Photoshop window, turn it on under the Window menu by clicking on Options so that a checkmark appears. Then, click and drag as before to choose an appropriate area nearby to fill in the texture of the patch and blend it with the previously established color.)

The hole repaired and the crease eliminated with diligent use of the clone stamp and spot healing brush, the image is restored to its original splendor.

Type 2: Smart repair using imgkits

Compared with the manual use of photoshop software, the biggest advantage of imgkits is that you only need to upload photos. The artificial intelligence system will automatically identify the wrinkles, spots, missing, color and other defects of the uploaded photos, and the photos can be repaired in 1 minute.

Restoring Old Photos: Repairing Visual Damage

Type 1: Repair with photoshop

Photographers are always on the lookout for automated shortcuts, but in most cases the best results can’t be achieved without human input. Nowhere is that truer than when it comes to removing the dust, debris and damage that sullies many old photos.

The original antique family photo in need of serious repair.

The best way to repair such damage is to open the image in Photoshop and zoom in close. Then, take your time using tools such as the clone stamp, spot healing brush, patch tool and content-aware fill in order to eliminate wrinkles, spots and rips. This is the most tedious, time-consuming portion of the process, but it’s also the one that can really make a ravaged old print look new.

Start with the face and work out from there. Because faces are the center of attention, they deserve the most help. If you can make the faces blemish-free, you can get away with less-aggressive repairs elsewhere.

The spot-healing brush is ideal for repairing small blemishes. Set the brush diameter to be easily larger than most of the spots you’ll aim for, but not much larger. Experiment with the type of brush, choosing between content-aware, create texture and proximity match to see what works best in a given scenario.

In general, I find content-aware to perform best in this type of repair, and in fact it did the majority of the heavy lifting on the damaged old portrait shown here.

In some cases, the spot-healing brush will create a blurry spot. These can stand out almost as much as the original damage, so instead switch to the clone-stamp tool in order to copy one area of the image onto another. To use it, again set a brush diameter slightly larger than the areas being repaired and alt-click (or option-click) on a neighboring area of “good” detail to be cloned, then click and drag (or use multiple clicks) to copy the good area over the damage.

I generally prefer a soft brush edge as well as a brush set at 100% opacity and flow, all because this will generally blend in more seamlessly with the surroundings. I also regularly use the fade control to dial back an overly aggressive edit.

To change the brush size, shape and hardness, control-click on the image to bring up a dialogue box that makes these changes easy.

The clone-stamp tool is also especially good for repairing areas with distinctive shapes, textures or patterns. A crease that runs through a jacket, for instance, needs to carry the image information through the repair in order to blend in better. A harder-edged clone stamp excels here, while the spot healing brush typically does not.

Another tool that works very well for making clone-style repairs is the patch tool. It can be used to grab a bad spot and replace it with a good one—especially useful for fixing a large swath of background or clothing. To use it, click on the patch tool (found under the spot healing brush) and ensure it’s set to “content aware” in the options bar, then click and draw a selection around the area to be repaired.

The patch tool works wonders on backgrounds to quickly and effectively repair large areas full of spots and scratches without obliterating detail.

Then, click inside the selection and drag to the area of the image you’d like to replace it with. It’s like a selection-based version of the spot-healing brush that blends repairs with their surroundings. For large areas of the background in this antique portrait, the patch tool easily speeds up the process while making effective repairs.

Another way I like to make slightly larger fixes is to use the content-aware fill tool. To use it, make a selection and then choose Content-Aware Fill from the Edit menu to open up the dialogue box, which allows for adjustments to the fill, but the default settings are a good place to start.

Remember that with all of these tools, when it comes to general spot removal and cleanup, it doesn’t have to be perfect the first time. You can always make further passes at later stages, getting smaller and finer details covered as you go. For starters, though, the approach is to simply take your time and eliminate the biggest, most eye-catching blemishes.

After a few hours of spot healing, clone stamping and patching—as well as the use of a curves adjustment layer—this family heirloom is restored nearly to its original state.

Type 2: Smart repair using imgkits

Compared with the manual use of photoshop software, the biggest advantage of imgkits is that you only need to upload photos. The artificial intelligence system will automatically identify the wrinkles, spots, missing, color and other defects of the uploaded photos, and the photos can be repaired in 1 minute.

Remove the background of a photo in 10 seconds: a quick guide to cutout

How to remove background or cut out things from a photo?

This is the most frequent question I found on Quora or other related sites and forums.Remove the background from a photo is easy or can be challenging.It depends on the photo you are going to cut out and the complexity of it.If your photo is simple and has clear outlines, then it is super simple to remove the background from it.

On the other hand, for a complex image, it is challenging to remove the background.Today, I am going to show you how to remove background in photo with imgkits.It takes only 30 seconds to remove the background with this tool.

Step 1. Go to the homepage of imgkits website

Drag the page down and find the Remove Backgound function.

Step 2. Upload photos that need to remove the background

Click the “Upload Image” button and select a photo from your gallery to remove the background.

sample graph

Step 3. Waiting can only remove the background of the photo

Please wait patiently for 5 seconds, the system will intelligently recognize the picture you uploaded and automatically remove the background of the picture.

Cutout result

Finally, you only need to download and save the photo after removing the background to the gallery. Of course, you can also choose to replace the background you like for the picture.

There are some more interesting features below, click to watch if you like it.

👉【How to Remove Watermark from a Photo

👉【How to Erase Wrinkles, Pimples and Skin Blemishes

👉【How To Repair Scratches, Tears, and Spots on an Old Photo

Intelligently remove the watermark and repair the picture without any trace!

Traditional watermarking methods may provide various methods such as fuzzy, dynamic fuzzy, corrosion, mosaic, frosted, and grid formats. It is also possible to use the average value of the surrounding image pixels, but it is nothing more than rigid, and it is easy to see the traces, which is very unnatural.

The following picture is an example

We use the traditional method to erase the characters in the upper right corner, and the average pixel value of the surrounding pictures

It can be seen that the traces are very obvious

Using Inpaint, you can recover some of the lost photos in a few seconds. Replace any missing, deteriorated or unwanted parts of the picture, it will automatically recognize the surrounding environment and perform intelligent filling, so that the repaired picture can easily remove the defects without any trace.

Screenshot demo

First wipe the area to be removed

Click “Start Repair

I can hardly see it anymore, the ripples on the water have even reappeared!

Which Professionals Use Online Background Removal Softwares?

Photos have become an essential part of the digital world. From personal to professional, and individual to business purposes, photos are widely used. HIgh-quality photos can be altered and modified to fulfill multiple needs. For instance, converting a social media display picture into a passport photo. Such changes require unique edits. 

Removing the background is one of the most common edits that is needed to modify a photo. Various professionals across multiple industries edit their photos and remove their backgrounds to optimize them to their full potential.

While manually removing background is a very hectic task, using an online AI tool is a viable option for most professionals. It’s easy and efficient. Let’s take a look at which professionals remove backgrounds from their photos.

Marketers.

Photos are widely used for marketing products. Because they can quickly deliver the product description rather than a long text or a video. However, photos used by marketers are usually edited intensively. The reason is that these photos need to be optimized to convert prospects into customers. These pictures deliver a call to action.

Removing the background is the first step in this editing. Marketers simply take a picture and use online AI tools to remove unwanted backgrounds. These backgrounds are then replaced by either white backgrounds or colored backgrounds.

Fashion models.

Photos are the most essential element of the fashion industry.  The average number of photographs taken by individual photographers ranges from 300-500 photographs every day! The fashion industry heavily relies on photoshoots. All of these photographs are then rendered and edited to be utilized across various platforms. 

Fashion models remove backgrounds from their photos to reduce subjects from their pictures. They use multiple bold color backgrounds instead, to make their photos more catchy. They use online background-removing tools almost every other day depending on their workload.

Social media influencers.

Social media influencers use background-removing tools to hook their audience. Editing normal photos and using engaging backgrounds make their pictures more appealing.

Most of the social media influencers remove the background to add bold text. The edited photo thus becomes more readable and is optimal for sending messages. 

Sports Journalists.

Sports journalists remove irrelevant backgrounds from players’ pictures to add relevant backgrounds. The most commonly relevant backgrounds are stats represented behind a player.

This is a widely popular custom edit that can be seen most commonly among sports journalists. They need quick edits as they look to broadcast the news of the player or the team, as soon as possible. Online AI software is the solution to this problem. They are efficient and time-saving.

Video Editors.

Professional video editors want to focus more on their video projects rather than editing individual photos. Not all products require background removal services to be used in videos.

But creative editors remove backgrounds from pictures to make them more engaging to their audience. Whenever they need photos for their project, they use AI software to remove backgrounds from required photos rather than removing themselves. This saves a lot of their time.

Photo editors.

Professional photo editors are slowly moving away from a few of their key professional services. The reason is that AI is slowly taking its place in the industry. This is not a good sign for professional photo editors.

However, they have realized that one day AI is going to take over the entire world anyway. So, there’s no point in resisting this change. Therefore, professional photo editors are increasingly jumping on the bandwagon these days. They are also using online AI tools for their clients.

Tiktokers and Youtubers.

We have combined this category as both YouTubers and Tiktokers edit their photos for a similar purpose and that is creating a unique and engaging thumbnail! The first step in creating a thumbnail is to remove the background from a high-expressive face. This is essential as no further edits are possible if the background is not optimized for a thumbnail.

A bold text is another element of a thumbnail. The background must have a contrasting relationship with the text to make it more readable. Therefore both the text and background need edits. Like all other users on our list, YouTubers and Tiktokers also use online AI software to escape the struggles and save their time.

Individuals.

It’s not easy to edit and optimize a photo for a particular purpose. You have to understand the specific need of the picture and apply specific edits to optimize it. Most individuals find it harder to edit photos, especially removing backgrounds. But thanks to AI, everyone can use the online background-removing software. It is super user-friendly and easy to use.

imgkits is one of the most convenient Online Background removing software. It produces stunning and accurate results. All you have to do is upload a photo, and with just a click, our background will be removed. Not only can you remove unwanted backgrounds but you can add custom backgrounds as well. You can also create a background of your own choice if you don’t want to use a custom background. There’s a universe of options out there.

While photos are being integrated more and more into our daily lives, it hard to imagine a future without digital interference. The future of AI is the future of humankind. Background removing software is only going to evolve in the future.

We still can’t comprehend the astonishing results this software is delivering. More professionals are using these AI tools every day to catch up with AI services.

How To Repair Scratches, Tears, and Spots on an Old Photo

As digital photography becomes more and more popular, many people turn their old paper photos to digital form to store and view them on modern computers. Nevertheless, old photos are not always in the perfect condition: tears, spots and cracks remain even on electronic pictures.

Inpaint fixes this problem by providing a simple way to remove various defects from old photos in merely two steps.

Step 1: Enter the inpaint old photo page

Step 2: Click the upload image button to select the scanned

Step 3: Wait for the system to process automatically

Wait a few seconds, the system will automatically process the scratches, tears and spots of the photos, and enter the effect preview page, and you can choose to save the repaired photos to the computer or mobile phone.